


Streaming on Twitch is an exciting way to connect with a global audience and share your passions. Whether you’re a gamer, musician, or content creator, getting started on Twitch can seem overwhelming at first. But don’t worry! This guide will walk you through everything you need to know, from setting up your account to optimizing your stream for the best viewing experience. Let’s dive into the first steps and get you ready to go live!
How to Stream on Twitch on PC: A Step-by-Step Guide
Streaming on Twitch from your PC is an exciting way to engage with a large audience and build your online presence. Whether you’re a gamer, a content creator, or someone with a special skill or interest to share, starting your Twitch stream doesn’t have to be complicated. By following this step-by-step guide, you can set up your stream, and be broadcasting in no time.
1. Create Your Twitch Account
The first step in becoming a Twitch streamer is to create an account. Go to Twitch.tv and sign up. If you already have an account, great! If not, click on "Sign Up" to create one. Be sure to choose a memorable username, as this will be how your viewers recognize you.
2. Download Streaming Software
To broadcast your content on Twitch, you need streaming software. The two most popular options are OBS Studio and Streamlabs OBS. Both are free and provide the tools you need for high-quality streaming. OBS Studio is slightly more customizable, while Streamlabs OBS is designed to be more user-friendly.
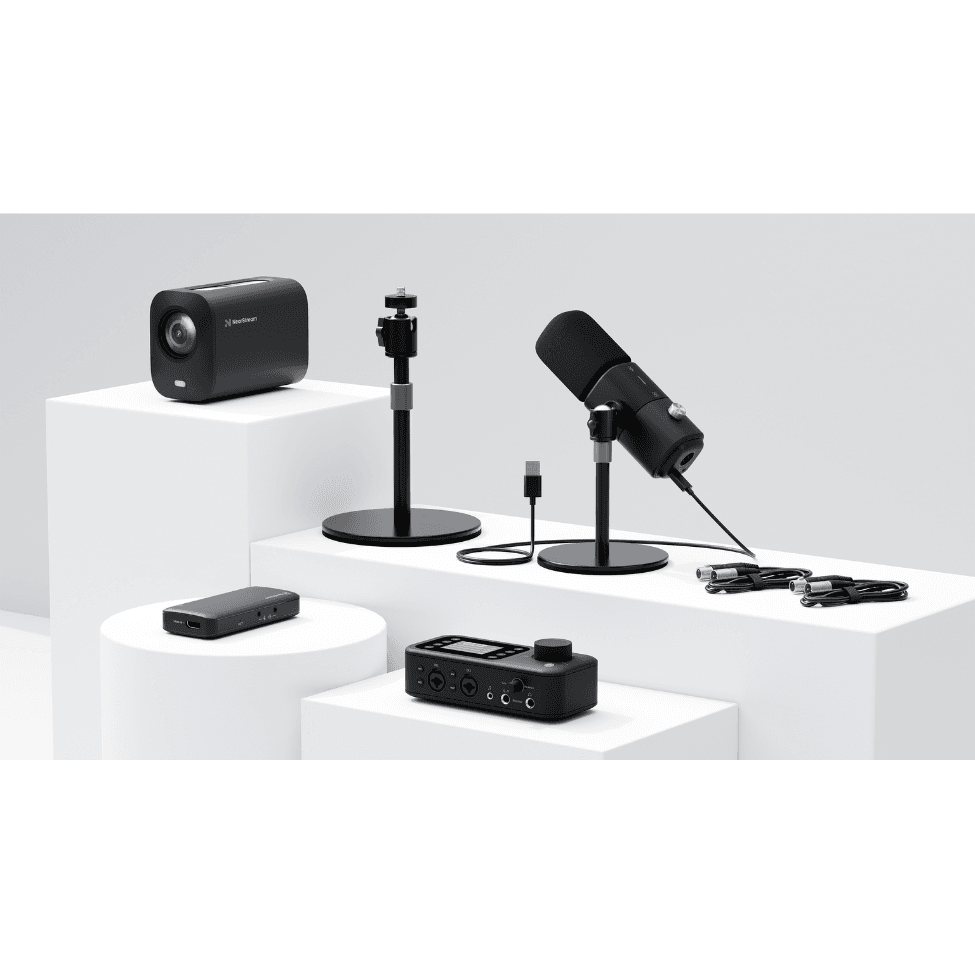
3. Set Up Your Camera and Microphone
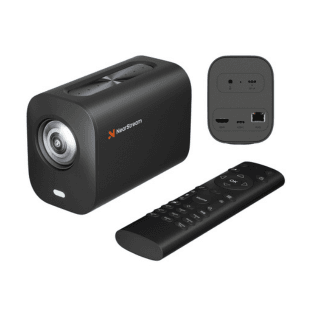
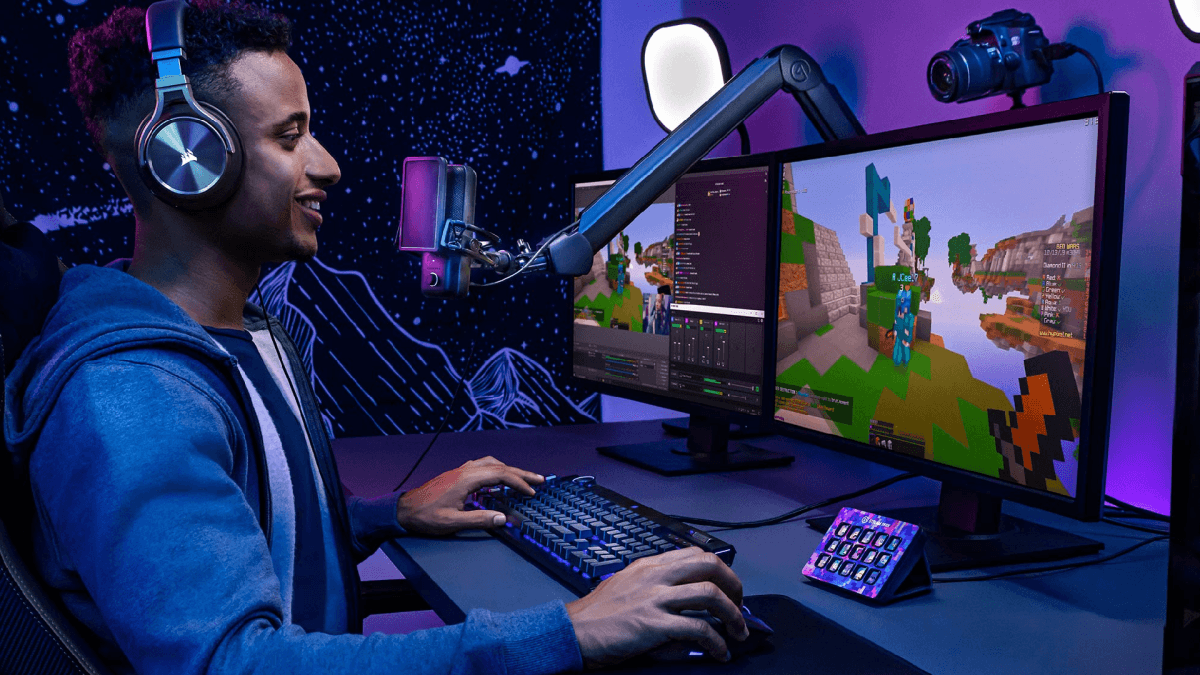
When it comes to streaming, video and audio quality are key. For high-definition video, the VM20 Streaming Camera is an excellent choice. This camera offers crisp, sharp visuals, ensuring your viewers get the best experience, with 4K video resolution, 10x optical zoom, HDMI out, and remote-control functionality. Additionally, the AM25X Condenser Microphone provides clear and professional sound. It is designed to deliver professional-grade audio quality for streamers, podcasters, and content creators. It features excellent sound clarity, a wide frequency response, and high sensitivity, ensuring clear and natural voice capture.
4. Configure Your Stream Settings
Once your software and hardware are connected, it’s time to configure your stream settings. Adjust the resolution, bitrate, and video quality in your streaming software to match your PC’s capabilities and internet speed. Make sure you’ve set up a scene that includes your camera feed, game capture, or any other content you want to display.
5. Connect to Twitch
Finally, connect your streaming software to your Twitch account. In OBS or Streamlabs, you’ll need to enter your Twitch stream key, which you can find in your Twitch account settings. Once the connection is established, you’re ready to go live at any moment!
With these five easy steps, you’ll be streaming on Twitch in no time. Now that you’ve set everything up, let’s look at the equipment and software you’ll need to ensure your stream is top-notch.
What You Need to Get Started: Equipment & Software for Twitch Streaming
1. Your PC Setup
A good streaming experience starts with a reliable PC. Ideally, your computer should have at least an Intel i5 processor (or equivalent) and 8GB of RAM. The graphics card is just as important, and you should aim for an NVIDIA GTX 10-series or higher to handle demanding streaming tasks smoothly.
2. Streaming Software
Both OBS Studio and Streamlabs OBS are free and feature-packed software solutions for streaming. OBS Studio gives you more control over advanced settings, while Streamlabs OBS is a more user-friendly option for beginners.
3. Camera for Streaming
For video quality, you can’t go wrong with the VM20 Streaming Camera. This camera offers Full HD quality and comes with features like auto-focus and excellent low-light performance, ensuring you look great even in dimly lit environments.
4. Microphone
Good sound is key to any stream. The AM25X Condenser Microphone is designed for streamers who want to capture clear, detailed sound.

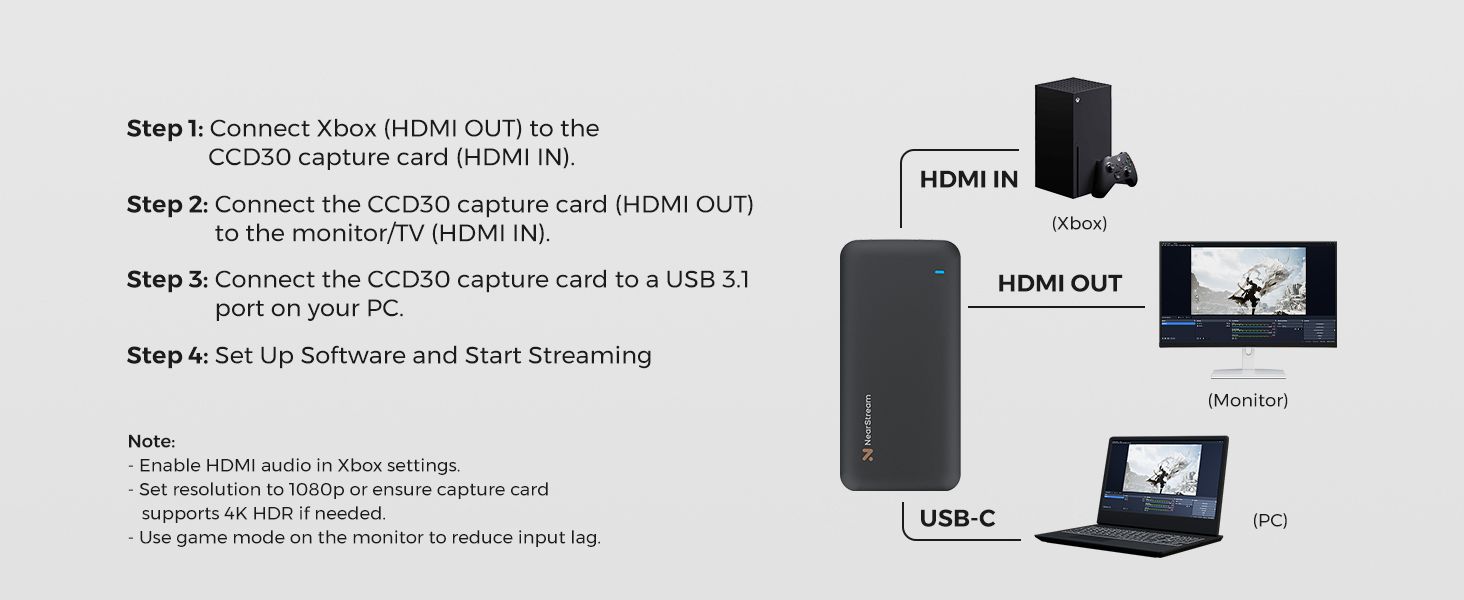
5. Capture Card
If you want to capture gameplay from consoles, a capture card is a must. The CCD30 Capture Card is an excellent choice for streamers who want to capture high-definition video from their gaming consoles, with minimal latency.
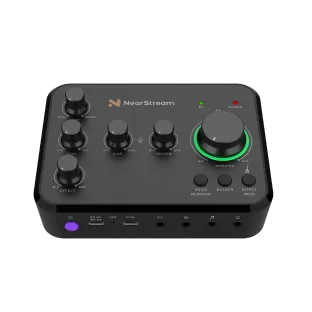
6. Audio Mixer
To make your stream sound even better, consider investing in an AMIX40U Audio Mixer. This device allows you to control multiple audio sources, ensuring you can manage the sound from your microphone, game audio, and any other audio sources you want to include in your stream.

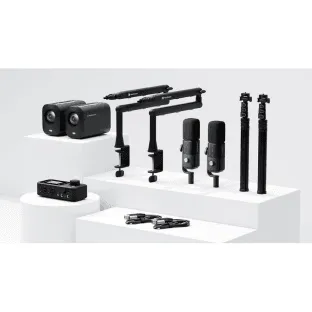
We also offer a complete set of solutions for gaming streaming that includes all of the above mentioned products. It allows you to easily assemble, easily get started, and immediately start your own game live journey.
How to Go Live on Twitch from Your PC: A Quick Walkthrough
Step 1: Open Your Streaming Software
Start by opening your streaming software (either OBS Studio or Streamlabs OBS) that you’ve already set up. Make sure all your scenes are organized and that your camera and microphone are working properly.
Step 2: Test Your Stream
Before you go live, it’s always a good idea to test your stream. Many streaming platforms, including Twitch, allow you to stream privately to check if everything is working properly. Test the video and audio quality, and ensure there is no lag or technical issues. You can also monitor your stream’s health using the tools in your streaming software.
Step 3: Adjust Stream Settings
Make sure that all settings are optimized before going live. Double-check your stream resolution and bitrate settings. If you experience lag or buffering during testing, consider lowering the resolution or bitrate to match your internet connection.
Step 4: Press “Start Streaming”
Once everything is set up and tested, it’s time to go live. In your streaming software, click on the “Start Streaming” button. This will start broadcasting your stream to Twitch. Ensure that your Twitch dashboard shows that the stream is active and that everything is functioning properly.
Step 5: Monitor Your Stream
Once you’re live, keep an eye on your stream's health through your streaming software and the Twitch dashboard. Look out for any signs of issues such as lag, dropped frames, or audio problems. Interact with your viewers by responding to comments and keeping the conversation flowing.
Step 6: End Your Stream
When you’re ready to end your stream, click on the “Stop Streaming” button in your streaming software. It’s important to ensure everything has been recorded if you want to save your stream or analyze it later. Afterward, check your Twitch channel for any recorded footage and analyze your performance.
By following these steps, you’ll be able to go live on Twitch quickly and easily from your PC.
Tips for Broadcasting on Twitch from Your PC: Enhancing Your Stream
When broadcasting on Twitch, it's not just about having good video and audio; it’s about creating an engaging and memorable experience for your viewers. Adding extra effects and interactive plugins to your stream can significantly improve your content's quality and help you build a strong connection with your audience. Here’s why and how you can enhance your stream with these elements.
Why Extra Effects and Interactivity Matter
Viewer Engagement
The more interactive your stream is, the more your viewers will feel connected to you. Interactive features, such as live chat, viewer polls, or alerts for follows and donations, keep viewers engaged. They can participate in real-time, making them feel like they are part of the experience.
Personalization and Branding
Effects such as animated overlays, custom transitions, and alerts help personalize your stream and make it stand out. These elements can reinforce your brand identity and make your stream feel unique. For example, having your own custom alerts when a new follower joins can make your viewers feel appreciated and encourage others to follow.
Entertainment Value
Twitch is a platform where entertainment is key. Extra effects like animations, sound effects, and dynamic alerts can keep your stream exciting and visually appealing. The more visually and audibly stimulating your stream is, the longer viewers will stick around, increasing the chances of them returning.
How to Add Extra Effects and Interactive Plugins to Your Twitch Stream
Use Stream Overlays and Alerts
Overlays are graphical elements that appear over your stream content, such as your webcam feed or gameplay. You can customize these overlays with your branding, such as your logo, social media handles, or donation goals. There are many free and paid overlay packs available online, or you can create your own using design software like Adobe Photoshop or Canva.
Alerts are notifications that pop up on the screen when something happens on your channel, such as a new follower, subscriber, or donation. To add alerts, you can use tools like Streamlabs or StreamElements. These platforms allow you to customize alerts with animations, sound effects, and even graphics that match your channel's theme.
Add Interactive Chat Widgets
A chat overlay displays live chat messages on your stream, allowing viewers to see what’s happening in the chat even if they’re not watching it in the chat window. This keeps the interaction alive and encourages more people to join the conversation.
You can engage your viewers with Twitch’s built-in polling and prediction features. These features allow your audience to vote on what happens next in your stream or make predictions about upcoming gameplay. You can easily set these up from your Twitch dashboard.
Install Interactive Plugins
Streamlabs offers a range of widgets you can add to your stream, such as a donation goal tracker, recent follower/subscriber list, and more. These widgets can be customized to match your channel’s design and can add a fun, interactive element to your stream.
Extensions are third-party tools that add extra functionality to your stream. For example, the Twitch Extensions catalog has interactive overlays for games, leaderboards for challenges, and even mini-games that viewers can participate in directly from the chat. Extensions can help create a unique, engaging experience that encourages more viewers to interact with your stream.
Use Sound Effects and Music
Adding sound effects and background music can make your stream more dynamic and entertaining. Services like Pretzel Rocks or Monstercat provide royalty-free music that you can legally play on Twitch. You can also use Twitch Sound Alerts to play sound effects at key moments, like when a viewer donates or follows.
Additionally, consider using the AMIX40U Audio Mixer to control sound levels during your stream, ensuring that your music, sound effects, and microphone volume are perfectly balanced.
Troubleshooting Common Issues When Streaming on Twitch from PC
1. Audio/Video Sync Issues
One of the most frustrating problems you might encounter during your stream is audio and video becoming out of sync. This can make the viewing experience jarring and distract from your content.
Solution:
● Adjust the Audio Delay: In your streaming software, you can add a slight delay to your audio to sync it with the video. This option can usually be found in the audio settings.
● Change the Buffer Size: Increasing the audio buffer size in your streaming software may help improve sync. You can experiment with different buffer sizes to find the optimal one for your setup.
● Check Your PC Performance: If your computer is struggling to keep up with the stream, it can cause lag and sync issues. Make sure that your PC meets the recommended system requirements for streaming.
2. Stream Lag or Buffering
Lag or buffering during a stream is one of the most common issues that can ruin the experience for your viewers. This issue is typically caused by problems with your internet connection or computer performance.
Solution:
● Lower the Bitrate: If you're experiencing buffering, try lowering the bitrate in your streaming software. A higher bitrate means more data is being transmitted, and if your internet connection can’t keep up, this could cause lag. Start with 3000kbps and adjust as needed.
● Reduce Resolution or Frame Rate: Reducing the stream's resolution to 720p or lowering the frame rate to 30fps can help alleviate lag, especially if your PC or internet connection is struggling.
● Check Your Internet Connection: A poor or unstable internet connection can lead to buffering. If possible, switch to a wired connection (Ethernet) instead of Wi-Fi for more stability. If using Wi-Fi is unavoidable, try to reduce the number of devices connected to the network.
3. Dropped Frames
Dropped frames are a clear sign that something isn't working right. When frames are dropped, viewers will notice lag and choppy video, which can significantly reduce the quality of your stream.
Solution:
● Check Your CPU Usage: Dropped frames are often caused by a high CPU load. Open your task manager (Windows) or activity monitor (Mac) to check your CPU usage. If it’s high, try closing unnecessary programs to free up system resources.
● Lower the Output Resolution or Bitrate: If your PC is struggling to keep up with the stream, reduce the output resolution or lower the bitrate. This will reduce the strain on your system and help prevent dropped frames.
● Update Your Graphics Drivers: Outdated or faulty graphics drivers can cause performance issues when streaming. Ensure your GPU drivers are up-to-date to avoid this issue.
4. Low-Quality Stream (Pixelated or Blurry Video)
If your video quality is pixelated or blurry, this typically indicates that your stream settings aren't optimized for your hardware or internet connection.
Solution:
● Increase Your Bitrate: If your stream is pixelated, increasing the bitrate can help improve video quality. However, be cautious not to set it too high if your internet connection can’t handle it.
● Adjust the Resolution: For clearer video, make sure you’re streaming at a resolution of 720p or 1080p. If you’re streaming at a higher resolution but experiencing low-quality video, reducing it to a more manageable resolution can help.
● Optimize Your Encoding Settings: In your streaming software, adjust your encoder settings. Try switching to the hardware encoder (if available) to offload some work from your CPU and improve stream quality.
5. Stream Freezing or Crashing
Sometimes, your stream may freeze or crash, which is an especially problematic issue during a live broadcast.
Solution:
● Check for Software Updates: Ensure that your streaming software is up-to-date. Developers frequently release patches and updates to fix bugs that could cause freezing or crashing.
● Close Background Programs: Running too many applications on your PC can cause instability. Close unnecessary programs, especially resource-intensive ones like video editing software or browsers with many open tabs.
● Check System Requirements: If your PC doesn’t meet the minimum system requirements for streaming, this could lead to crashes. Consider upgrading your hardware if needed to ensure a smoother streaming experience.
How to Grow Your Twitch Audience When Streaming on PC
Growing your Twitch audience requires more than just streaming. Here are some tips to help you attract viewers and build a community:
Stream Consistently
Set a regular streaming schedule and stick to it. Consistency helps build an audience who knows when to tune in.
Engage with Your Viewers
Respond to comments in the chat, ask questions, and create an interactive experience.
Promote Your Stream
Share your stream on social media platforms, join gaming communities, and collaborate with other streamers to increase visibility.
Offer Unique Content
Find a niche or unique angle that sets you apart from other streamers. Whether it’s specific games, challenges, or content themes, make your stream stand out.
Conclusion: Master the Art of Streaming on Twitch from Your PC
Mastering the art of streaming on Twitch from your PC requires the right setup, attention to detail, and continuous improvement. By ensuring your software is configured correctly, your equipment is optimized, and you're engaging with your audience, you’ll create a professional and entertaining stream. Troubleshoot any issues quickly, keep learning, and experiment with new features to enhance your content. With dedication and consistency, you’ll be well on your way to building a successful Twitch streaming career.