


With over 131,924 viewers relying on it for streaming guidance, OBS Studio has become a top choice for content creators worldwide. If you're new to live streaming, learning how to stream using OBS can open the door to professional-quality broadcasts—without the high cost. OBS Studio is a free, open-source tool packed with features like multiple video sources, six audio tracks, and real-time transitions.
Its Auto-Configuration Wizard helps beginners set up effortlessly. In contrast, advanced users benefit from powerful customization options. Whether you're streaming games, tutorials, or live events, this guide will walk you through every step to go live confidently and professionally using OBS Studio. This article will cover everything from setup to expert tips to help you stream like a pro. Let’s get started on your path to seamless obs streaming success.
What is OBS, and why is it used for streaming?
What is OBS Studio?
OBS Studio is short for Open Broadcaster Software. It’s a free and open-source program used for video recording and live streaming. It’s a cross-platform solution available on Windows, macOS and Linux, so it has a broad reach and consistent performance across different systems.
At its core, OBS lets you capture audio and video in real time and combine multiple sources—like webcam feeds, screen captures, browser windows, and more—into custom scenes. These scenes can be switched during a broadcast using custom transitions, so you can have professional-quality production without the need for complex editing tools.
Key features of OBS Studio include:
High quality real-time audio and video capturing
Unlimited scenes and source layering
Modular Dock UI for customizable interface layouts
Powerful audio mixer with filters (noise gate, suppression, gain)
VST plugin support for enhanced audio processing
Streaming to platforms like Twitch, YouTube, Facebook, and Instagram via RTMP
Efficient encoding with support for x264, NVENC, Quick Sync and AMD VCE
Despite being professional grade, OBS Studio is lightweight (under 600 MB) and runs efficiently even on entry level hardware.
Why do Creators and Streamers Love OBS?
Content creators love OBS Studio for several reasons:
1. It’s 100% Free and Open-Source
Unlike many paid alternatives, OBS doesn’t charge for its features. You get full access to everything—no watermarks, usage limits or hidden fees. This is perfect for beginners who want to start streaming without investing upfront.
2. Full Creative Control
From custom layouts with multiple sources to audio filters, transitions and overlays, OBS has total control. Advanced users can expand its functionality with plugins, scripts and integrations to fine tune their setup.
3. Low System Resource Usage
OBS is optimized for performance. It uses fewer CPU and memory resources than many competitors, which is essential for streamers who game and broadcast from the same machine.
4. Active Community and Ongoing Development
As an open-source tool, OBS benefits from a global community of developers and users. This community updates the software, creates plugins, and offers support through forums, tutorials and documentation.
5. Cross-Platform Compatibility
Creators aren’t limited to one OS—OBS runs smoothly on Windows, macOS and Linux, which is especially helpful for those working across multiple devices or platforms.
OBS vs. Other Streaming Software: Pros and Cons
Compared to alternatives like Streamlabs, XSplit and Bandicam, OBS holds its own as a top contender. Here’s how it stacks up:
OBS Studio – Pros:
Completely free and open-source
Compatible across multiple operating systems
Low system resource usage
Endless customization via plugins and settings
Supported by an active, passionate community
OBS Studio – Cons:
The steep learning curve for beginners
The initial setup may be overwhelming
Some features require third-party plugins
Basic video editing tools (not built-in)
No official tech support team (community-based help only)
Streamlabs offers a more polished user interface and built-in widgets but consumes more resources and restricts features behind premium plans. XSplit is beginner-friendly with sleek designs but charges for full access. Bandicam, while great for recording, isn’t designed for serious live streaming.
OBS is the top choice for streamers who value control, flexibility, and community-driven innovation. Whether you’re streaming your first game or building a professional broadcast setup, OBS Studio gives you the tools to do it—all without spending a dime.
Step-by-Step: How to Stream with OBS
A well-laid-out process will help you set up OBS for your first stream. This piece breaks down the process into manageable tasks that will give you the confidence to go live.
Step 1 – Downloading and Installing OBS Studio
OBS supports Windows, macOS, and Linux, and best of all, it’s completely free.
Start by visiting the official OBS Studio website.
C
 lick on the Windows icon (or Mac/Linux, based on your system).
You’ll see three download options:
Installer (recommended): Just double-click and follow the setup wizard.
Zip File: Extract the folder and run obs64.exe manually.
BitTorrent: Use this if you're familiar with torrent clients.
To install using the Installer:
Open the .exe file you downloaded.
Click Next through the setup screens.

Choose a location to install OBS or keep the default.
Click Install and wait for the process to finish.

Once installed, launch OBS Studio.
Step 2 – Connecting OBS to Your Streaming Platform (Twitch, YouTube, Facebook Live)
The next step connects OBS to your chosen streaming platform:
Open OBS and click Settings in the bottom right
Select the Stream tab
Select your streaming service from the dropdown (e.g., Twitch, YouTube, Facebook Live).
Log in or paste your Stream Key, which you can find in your account settings on the chosen platform.

Click Apply and then OK to save your connection.
This step links OBS to your broadcasting destination so your live feed can be transmitted properly.
Step 3 – Setting Up Your Video and Audio Sources
Before going live, you need to define what OBS will display and what audio it will broadcast.
In the Scenes panel, create a new scene and name it.
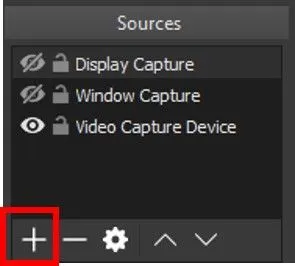
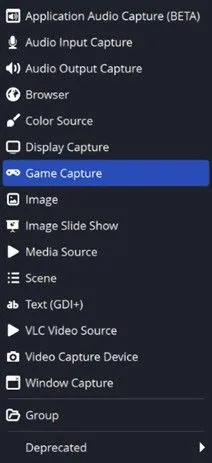
In the Sources panel, click the “+” icon and add:
Video Capture Device for webcams or cameras.
Display Capture or Window Capture for screen sharing or specific applications.
Image or Text (GDI+) for adding logos, overlays, or labels.
For audio:
Go to Settings > Audio and select your mic and desktop audio.
Use the Audio Mixer to adjust volume and apply filters like noise suppression or gain.
Step 4 – Creating and Managing Scenes in OBS
Scenes help you organize your stream content and switch between layouts:
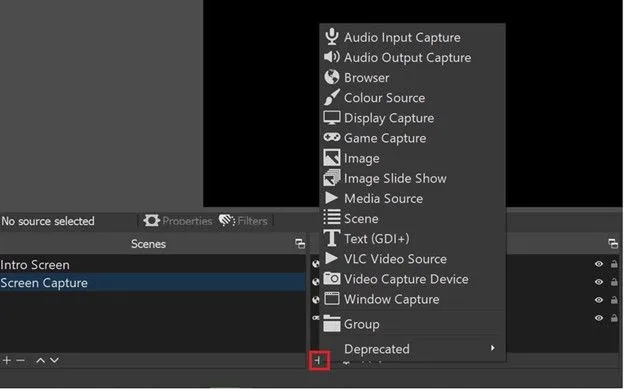
Click the “+” in the “Scenes” box to add new scenes.
Each scene can have its own video, audio, text, or image sources.
Use hotkeys (set in Settings > Hotkeys) to switch between scenes smoothly.
Want to look pro? Add overlays, logos or custom transitions under Scene Transitions.
This step is important if you’re switching between different content types like live cam, gameplay or presentation slides.
Step 5 – Adjusting Stream Settings (Bitrate, Resolution, Frame Rate)
Optimize your stream settings for smooth playback and high video quality. Proper stream settings are crucial for video and audio:
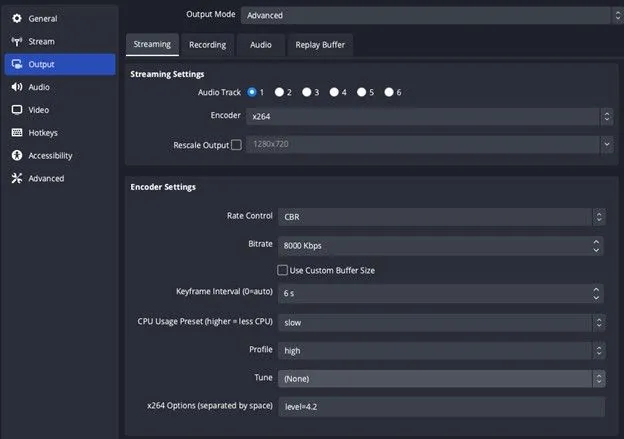
Go to Settings > Output:
Set Output Mode to Simple (or Advanced if you need more control).
Choose a bitrate for your upload speed (e.g., 2,500–6,000 kbps for 1080p).
Select your Encoder: x264 (CPU) or NVENC/AMD (GPU).
In Settings > Video:
Set your Base (Canvas) Resolution and Output (Scaled) Resolution.
Adjust your FPS to 30 or 60, depending on your content and bandwidth.
Make sure your Audio Bitrate is set correctly (128–320 kbps).
OBS will recommend settings, but you can always adjust them based on performance and quality goals.
Step 6 – Going Live! A Walkthrough of the Start Streaming Button
Now everything is set up, go live:
Double check your scenes and sources in Studio Mode before going live.
Click the Start Streaming button in the main OBS window.
OBS will start sending your stream to the connected platform.
Use the Stats panel to monitor stream performance, CPU usage, and dropped frames.
When you’re done streaming, just click Stop Streaming to end the broadcast.
With these steps you’ll be streaming like a pro in no time. Whether you’re a beginner or a seasoned creator, OBS gives you the flexibility and power to create amazing content.
That’s it! Now you know how to stream on OBS like a pro.
OBS Streaming Setup Essentials

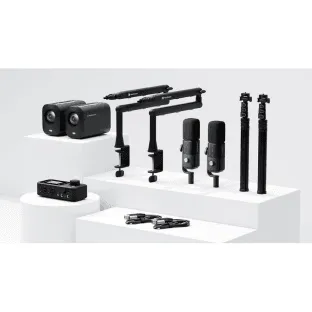
The right hardware makes all the difference in OBS live streaming. Good equipment will give your broadcasts a smooth operation and a professional look without technical issues. Nearstream offers a wide selection of reliable equipment that integrates seamlessly with OBS, whether you're streaming games, podcasts, or live shows.
Cameras and Microphones That Work Seamlessly with OBS
A high-quality camera gives your stream the clarity viewers expect. For creators seeking plug-and-play performance, the 4K streaming camera for webcam use delivers ultra-clear video and can be used as both a webcam and a DSLR-quality optical streaming device. It's also available as part of Nearstream’s Streaming Kit, designed for platforms like YouTube and Twitch.
Looking for a truly cinematic touch? The 10X Optical Zoom Wireless Streaming Camera is the Nearstream hero product. It offers full wireless functionality and smooth OBS integration. It's ideal for professional broadcasts and large-scale productions.
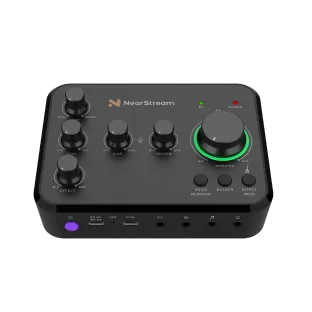
For audio, the USB & XLR Condenser Microphone provides flexible recording options with crystal-clear vocal capture. Alternatively, the USB microphone for streaming and podcasting is perfect for solo streamers and podcasters. Pair your mic with the Portable Audio Mixer to gain finer control over your sound levels in OBS.
If you’re building a full studio setup, explore the Nearstream Complete Podcasting Kit to get everything you need for a professional-quality production.
Capture Cards and External Devices
Capture cards connect external devices—like consoles or DSLR cameras—directly to OBS. The 4K60 USB 3.1 Capture Card from Nearstream supports Xbox, PS5, Nintendo Switch and DSLR cameras. With USB 3.1 bandwidth, it delivers uncompressed video without frame drops or latency issues—making it a favorite for high-performance streaming.
Console streamers can also check out the Game Streaming Kit, which includes everything needed for a pro-quality setup—including a camera, capture card and mic—all optimized for OBS.
To add a capture card in OBS:
Click the plus sign under “Sources” and choose “Video Capture Device”.
Name your source and click OK.
Select the capture card in the dropdown menu and adjust the resolution and FPS settings.
Always plug your capture card into a USB 3.0 or 3.1 port for maximum performance.
Lighting and Background for a Pro Look
Lighting makes your stream go from basic to broadcast quality. While OBS filters can adjust color and clarity, physical lighting is key. Consider adding front-facing lights and soft backlights to reduce shadows and enhance facial features.
Once your lighting is set up, use OBS filters such as:
Color Correction – to balance skin tones and white levels
Sharpening – to refine soft or lower-resolution camera feeds
Chroma Key – for virtual backgrounds or green screen effects
If you need mobility and flexibility, Nearstream’s Wireless Microphone provides great sound regardless of your studio layout.
In short, with optimized visuals, reliable audio and Nearstream’s pro-grade tool, you’re ready to stream anything—gaming, podcasting or a live show.
Tips to Improve Your OBS Streaming Experience
The difference between amateur and professional-looking broadcasts often comes down to how well you optimize your OBS setup after the original configuration. Streamers with experience know that better performance and engaging elements can boost viewer retention dramatically.
Reducing Lag and Dropped Frames
Frame drops can quickly destroy your streaming experience. OBS forum reports show these problems typically come from network limitations or system resource overload. The OBS statistics panel helps you identify the specific type of lag. You can minimize network-related drops by enabling "Dynamically change the bitrate to manage congestion" and "Enable network optimization" in Advanced Settings.
Adjusting the canvas resolution to a smaller size improves rendering lag. You should lower your output frame rate from 60fps to 48fps or 30fps. Game capture uses nowhere near the resources of display capture, making it the better choice whenever possible. A wired ethernet connection, rather than WiFi, will give you consistent connection speed.
Using Hotkeys to Simplify Live Transitions
Professional streams stand out with smooth scene transitions. Hotkeys eliminate menu navigation during broadcasts and reduce interruptions. You can set these up through Settings → Hotkeys, where each scene gets its own keyboard shortcut.
Streamers running complex productions might want dedicated control devices like the Elgato Stream Deck with its programmable buttons. Mobile apps like Touch Portal turn your smartphone into an affordable OBS control panel. These tools let broadcasters focus on creating content instead of managing software.
Adding Overlays, Alerts, and Widgets for Engagement
OBS doesn't include built-in alert systems, but Browser Sources let you add third-party services that create dynamic viewer interactions. StreamElements and similar platforms provide customizable overlays with donation alerts, subscriber notifications, and goal trackers.
These engagement elements respond to channel events live and acknowledge viewer support to encourage participation. Your overlays should follow cohesive theme packages that keep consistent branding across starting screens, breaks, and main broadcast elements.

Recording While Streaming – Dual Purpose Setup
In OBS, you can stream and record content simultaneously, which gives you a local backup if your internet fails. This feature protects against connection problems and lets you edit highlight videos later.
Advanced output mode lets you set up separate encoding settings for recordings under Output → Recording. Recordings work better with higher bitrates and quality-focused encoding than speed-optimized streaming presets. Long sessions need careful disk space monitoring - high-quality recordings can fill up your storage quickly over six hours.
OBS Plugins and Add-Ons to Enhance Your Stream
OBS Studio's main strength comes from its ability to expand through third-party plugins and visual customizations. These additions can turn a basic broadcasting setup into a powerful streaming tool that fits your specific needs.
Recommended OBS Plugins for Performance and Style
Here are some of the best plugins to improve how your stream looks, sounds, and runs:
StreamFX: This plugin adds cool visual effects like blur, 3D changes, and custom filters. It makes your stream look more professional and polished.
Move Transition: Want smooth animations when switching scenes? This plugin helps you create smooth, eye-catching transitions to keep your audience engaged.
Streamlabs Plugin: This combines your alerts, overlays, and widgets inside OBS. It’s perfect for streamers who want to avoid opening multiple apps while streaming.
NDI Plugin: If you stream from more than one computer, this plugin lets you send high-quality video between them without capture cards.
ReaPlugs VST FX Suite: Sound is just as important as video. These audio tools give you better control of your microphone with features like EQ and noise reduction.
Advanced Scene Switcher: This plugin automatically changes scenes based on time, active windows, or other rules. It’s great for streamers with busy setups.
Lua Scripts: These scripts help automate tasks that you do often while streaming. You can save time and focus more on your content.
Aitum Vertical: If you create content for TikTok or Instagram, this tool captures vertical video live. You won’t need to crop or re-edit your footage later.
Custom Themes and Visual Enhancements
OBS Studio lets you customize themes to make the interface your own. Version 28 has several built-in themes: the navy-blue-tinted Yami theme (now the default), the Gray theme for a classic look, and the Light theme for brighter interfaces.
Adding custom themes is easy - just put them in your user folder's themes directory. The OBS community has created many theme options. Popular ones include Twitchy (Twitch-inspired), Neon (clean interface), and Production Pro (made for professional events).
You can create your own themes with QSS files (like CSS) and custom images to change every visual aspect of OBS.
OBS and Streaming Kits: Powering a Pro Setup
Upgrading from basic streaming to professional-quality broadcasts means having the right tools. OBS (Open Broadcaster Software) is a powerful program, but it works best when paired with the right gear. That’s where streaming kits come in. These all-in-one bundles take out the guesswork and help you stream like a pro.
How Our Streaming Kit Simplifies OBS Configuration
Setting up OBS can be tricky, especially for beginners. But with a game streaming kit, everything is pre-configured to work smoothly. Each part of the kit—camera, microphone, capture card—is chosen for its strong compatibility with OBS.
The software’s Auto-Configuration Wizard makes setup even easier. It checks your computer, internet speed, and goals and then sets the best options for you.
Instead of spending hours trying to fix technical issues, you can start streaming in minutes. From bitrate to encoder settings, the hard part is done for you. You just focus on your content.
Looking for podcasting tools too? Check out the podcasting kit with optimized audio gear made for creators.
Bundled Gear for Smooth Video and Audio Output
A good stream depends on great audio and video. That’s why our kits include tested gear that delivers clear sound and crisp visuals. Tools like the Portable Audio Mixer and USB microphone for streaming and podcasting keep your voice sounding great. For even better sound, try the USB & XLR Condenser Microphone or the wireless microphone for hands-free use.
When it comes to visuals, our 4K streaming camera for webcam use and DSLR-quality optical camera help you look sharp on screen. Want to zoom in on the action? The 10X Optical Zoom Wireless Camera is perfect for that. And if you’re gaming or using a DSLR or console like PS5 or Switch, the 4K60 USB Capture Card ensures high-quality, low-latency streams.
In order to get smooth streaming, make sure your internet upload speed is at least 5 Mbps. Set your video bitrate to 4000 Kbps for 1080p at 30fps and audio bitrate to 160–320 Kbps, depending on your content. Use a keyframe interval of 2 seconds for the best balance between quality and performance.
Start streaming with confidence. Visit Nearstream.us for complete kits that make learning how to use OBS easier than ever.
Troubleshooting Common OBS Streaming Issues
Broadcasters with years of experience still face technical challenges at the time they stream with OBS. These problems have simple solutions once you identify their root cause.
Fixing Audio Sync Problems
Viewers notice audio desynchronization right away, making it one of the most annoying streaming issues. This happens because video and audio processing speeds differ. The solution lies in the Advanced Audio Properties menu, which you can access by clicking the gear icon next to your audio source in the mixer. Your audio lags behind? Add a negative offset (like -500ms for a half-second adjustment) to realign sounds with visual elements.
Hardware conflicts or monitoring settings might cause ongoing sync problems. The audio monitoring feature runs on a different clock than OBS, which can make sync issues worse over time. You can quickly fix this by switching the monitoring setting to "Monitor Off" and back again. This resets the buffer without affecting your stream.
Stream Not Starting? Here's What to Check
The "Starting the output failed" message requires a few basic checks. Your video drivers should be up to date, especially if you use NVENC or AMD encoders. Running OBS as administrator helps ensure proper permissions.
OBS shows up in your task manager but won't start. End the process manually before you restart. Your security software might block streaming connections. Try disabling firewalls or creating exceptions for OBS to rule out network issues. Platform-specific problems need testing with different streaming services. This helps determine if OBS or the platform causes the issue.
Optimizing OBS for Low-End PCs
Your modest hardware needs careful adjustment of settings to stream smoothly:
Set a resolution to 720p and reduce the frame rate to 30 FPS
Keep video bitrate around 320 kbps for decent quality
Choose x264 software encoder instead of hardware options
Limit in-game frame rates to 75% of your system's normal performance to save resources for OBS
Limited hardware runs OBS well with proper configuration. Updated graphics drivers and closed background apps improve performance without new hardware.
Conclusion
Streaming with OBS Studio doesn’t have to be complicated. With the right setup, some practice, and a few tweaks, you can create high-quality, professional broadcasts—whether you’re gaming, podcasting, or hosting a live event. OBS is free, flexible, and powerful, making it the perfect tool for beginners and experienced streamers alike. Don’t forget—using reliable equipment can make all the difference.
Ready to upgrade your stream? Explore the Nearstream all-in-one streaming kits and gear designed for smooth OBS integration. Visit Nearstream.us today and take your live broadcasts to the next level!
FAQs – OBS Streaming
Can I stream on OBS without a capture card?
Yes, you can stream on OBS without a capture card. OBS has built-in features like Game Capture, Window Capture, and Display Capture that let you stream content directly from your computer. These options work great for PC games, apps, or your full screen. You only need a capture card if you're using a console (like Xbox or PS5) or a non-USB camera.
What platforms can I use to stream with OBS?
OBS supports all major platforms that use the RTMP protocol, such as Twitch, YouTube, Facebook Live, and more. You just connect your account or add your stream key to the settings. If you want to stream to multiple platforms at once, you can use tools like the Restream plugin to do that without overloading your computer or internet.
Is OBS good for beginners?
Yes, OBS is beginner-friendly—especially with the Auto-Configuration Wizard, which automatically sets the best options based on your hardware and internet speed. While the interface may look advanced at first, many new streamers find it easy to use after a bit of practice. Plus, OBS gives you powerful customization features that simpler apps don’t offer.
How do I record and stream at the same time?
OBS allows you to record and stream at the same time. Just follow these steps:
Open Settings > Output
Go to the Recording tab
Choose "Same as stream" for quick setup, or adjust settings for better recording quality.
This way, you’ll have a backup saved on your computer even if your stream has issues. It’s also great for creating clips and highlighting videos later.