


Twitch streaming has become more competitive than ever, with over 9.7 million monthly broadcasters. Many aspiring streamers face challenges with complex setup processes and performance problems that can make or break their streaming experience.
OBS (Open Broadcaster Software) offers creators a free and open-source streaming solution to achieve professional-quality streams without spending much. The optimized performance of OBS Studio cuts down the FPS effect of streaming by up to 66%. This ensures smooth broadcasts even when gaming gets intense, whether you're streaming at 1080p/60fps or 720p/30fps.
This complete guide covers the entire OBS stream setup for Twitch. You'll learn everything from basic configuration to advanced features that will help you build a professional streaming setup that stands out in today's competitive space.
Why OBS is the Best Choice for Twitch Streaming?
OBS Studio is the best choice for Twitch streaming. It has amazing flexibility and performance that other broadcasting software can't match. Unlike paid options, OBS gives you professional-quality streams without any subscription fees or watermarks.
OBS vs Other Streaming Software – What Sets It Apart?
OBS Studio's open-source foundation distinguishes it from competitors like XSplit. XSplit has similar features, but OBS offers complete customization at no cost and uses fewer system resources than other options. This makes it a great choice for streamers who need to game and broadcast simultaneously.
The performance benefits are huge. Through collaboration with industry leaders like NVIDIA, OBS has cut the FPS impact during streaming by up to 66%. Games run smoothly even during live broadcasts—something gaming content creators on Twitch really need.
OBS Studio also works on Windows, macOS, and Linux. You can use whatever operating system you prefer. This flexibility and its small resource footprint make it perfect for users with basic computers or those running multiple programs at once.
Key Benefits for Twitch Streamers
Twitch streamers get several OBS features that boost their broadcast quality and viewer experience:
Direct Twitch Connection: OBS links straight to Twitch. You can go live with minimal setup.
Complete Scene Control: You can create unlimited scenes with multiple sources like window captures, images, text, browser windows, webcams, and capture cards.
Professional Audio Control: The easy-to-use audio mixer has per-source filters for noise gates, noise suppression, and gain. This gives you a crystal-clear sound.
Studio Mode: You can preview scenes before they go live. Your transitions look polished, and viewers will never see the preparation.
System Requirements for OBS Streaming on Twitch
You need more than just OBS to run a successful stream. Quality content delivery to your Twitch viewers depends on good hardware and a reliable internet connection.
Recommended PC Specifications
Your computer's capabilities directly affect your OBS stream's performance. OBS's official requirements list Windows 10 or 11, a DirectX 10.1 compatible GPU, and a compatible CPU. But these basic specs won't give you the quality stream you want.
Your system should have these specs to stream well:
CPU: Intel i7 8700K or AMD Ryzen 1600X (or newer) to encode better
RAM: 8GB minimum, but 16GB works better for multitasking
GPU: NVIDIA GeForce 10 Series, AMD Radeon 5000 Series, or Intel Xe graphics
Storage: You need at least 500MB of free space to install OBS
Your choice of encoding method changes what hardware you need. X264 encoding uses your CPU and cuts your in-game FPS. GPU encoding (like NVIDIA NVENC) uses your graphics card's hardware instead, so you can play and stream without losing performance.
Budget-conscious streamers can still use a 3-year-old i5 processor that handles streaming well with the right OBS settings. Just don't try 4K videos or heavy plugins.
Internet Speed and Network Considerations
Your upload speed can make or break your Twitch stream. Streaming at 720p/30fps needs 2 to 5.4 Mbps upload speed. A 1080p/60fps stream needs 6 to 12 Mbps.
Upload speeds change often, so add a 35-40% buffer above your chosen bitrate. To name just one example, see a 4 Mbps bitrate stream - your connection should handle at least 5.7 Mbps upload speed to stay stable.
Network stability matters as much as speed. Wired ethernet gives you better reliability than WiFi. WiFi might work great today but cause issues tomorrow. Even great WiFi that works for browsing might fail when you stream because streaming doesn't handle jitter and latency well.
Twitch says to use CBR (Constant Bit Rate) encoding instead of VBR (Variable Bit Rate). VBR can buffer during stream transitions from low to high action content. This leads to broadcast problems when your network can't handle sudden bandwidth jumps.
How to Download and Install OBS for Twitch
Setting up OBS starts with downloading and installing the software correctly. The setup process is simple, and doing it correctly will ensure smooth performance for your Twitch streaming setup.
Where to Get OBS Studio
You can download OBS Studio for free from the official website (obsproject.com). This open-source software doesn't have any watermarks, subscription fees, or commercial use restrictions. The software works with several operating systems:
Windows: Compatible with Windows 10 and 11
macOS: Supports macOS 11.0 and newer
Linux: Available via Flatpak on Flathub and PPA for Ubuntu 24.04+
The official website has different download options. You can choose from standard installers, BitTorrent downloads, and portable versions. Mac users will find separate downloads for Intel-based Macs and Apple Silicon processors, which makes it work well with all hardware generations.
Step-by-Step Installation Guide
OBS Studio is a free, open-source desktop application available for Windows, macOS, and Linux. You can download it directly from the official OBS Studio website.
Follow these steps to download and install OBS Studio:
For Windows:
- Go to obsproject.com and click the Windows icon.
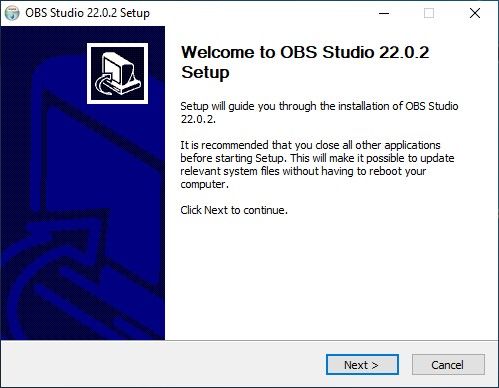
- The .exe installer will download—once it's done, double-click it.
- Follow the installation prompts:
- Click Next on the welcome screen.
- Accept the License Agreement.
- Choose your installation folder or leave it as default.
- Click Install.
- When it's done, click Finish to launch OBS Studio.
For macOS:
- Visit the OBS Studio site and click the macOS icon.
- Download the .dmg file.
- Open the .dmg and drag OBS Studio into your Applications folder.
- Launch it from your Applications folder (you may need to approve it in System Preferences > Security & Privacy).
For Linux:
- OBS provides instructions depending on your distro. You can find specific command lines and packages on their Linux installation page.
Once installed, you can run the Auto-Configuration Wizard in OBS to optimize your settings for Twitch streaming.
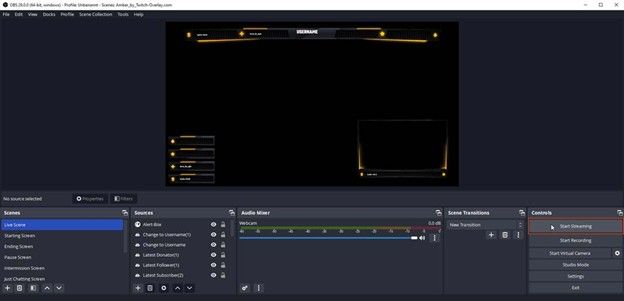
How to SetUp OBS for Twitch Streaming
A professional streaming experience starts with the right OBS configuration for Twitch after installation. The proper setup will give you smooth broadcasts with the best audio and video quality. Here is how to setup OBS for streaming on Twitch from scratch.
Connecting OBS to Your Twitch Account
You can link OBS with your Twitch channel in just a few steps:
Step 1: Get Your Twitch Stream Key
- Log in to your Twitch account.
- Click your profile icon in the top-right corner and select "Creator Dashboard."
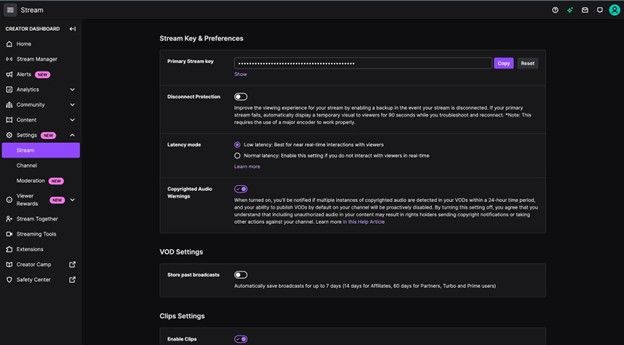
- In the left-hand menu, go to Settings > Stream.
- Locate the "Primary Stream Key" section.
- Click "Copy" to copy the stream key to your clipboard — you’ll need this to link OBS with your Twitch channel.
Step 2: Download and Install OBS Studio
If you haven’t already:
- Go to OBS Studio's official website, download the version for your operating system, and install it.
- Once installed, launch OBS Studio.
Step 3: Configure OBS for Twitch
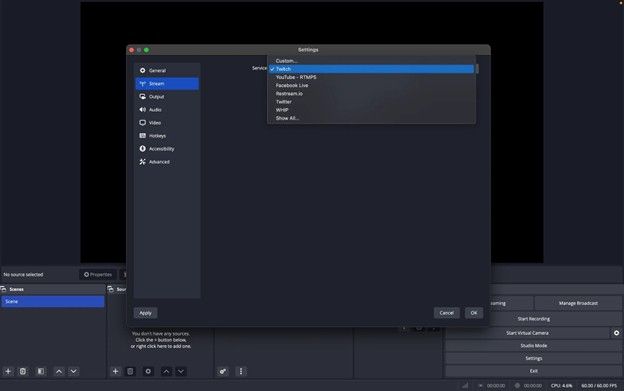
- Open OBS Studio and click "Settings" in the bottom-right corner.
- In the settings menu, click the "Stream" tab on the left.
From the "Service" dropdown menu, select Twitch.
Paste your Twitch stream key into the "Stream Key" field by pressing Ctrl + V or right-click and select Paste.
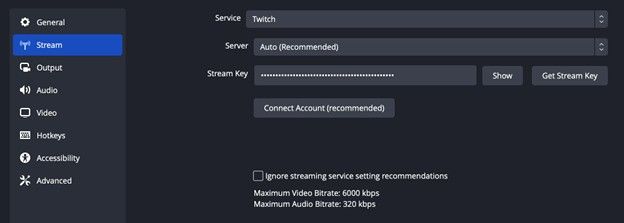
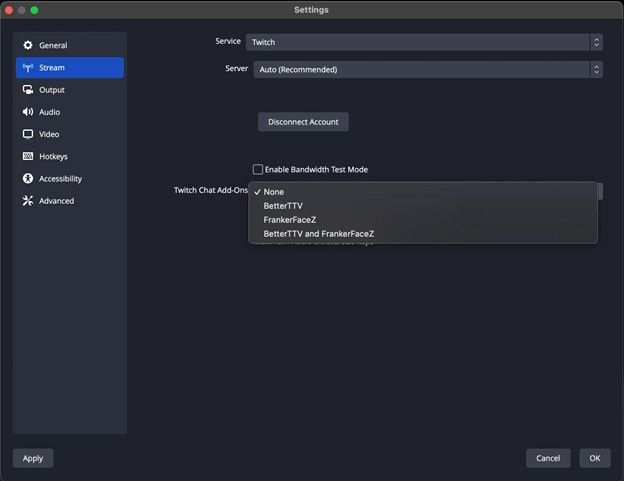
- You can also choose to Connect Account instead of using the stream key manually — this lets OBS link directly to your Twitch account.
Once connected, you’ll have additional options like enabling Twitch Chat Add-Ons right from OBS.
That’s it! Your OBS Studio is now connected to Twitch, and you’re ready to start streaming. Just hit “Start Streaming” in OBS when you’re ready to go live.
Configuring Video and Output Settings
The best Twitch streaming quality needs these settings:
Switch Output Mode to "Advanced" under the Output tab
Pick your encoder: NVENC for NVIDIA GPUs, AMF for AMD GPUs, or x264 for CPU encoding
Set Rate Control to "CBR" (Constant Bit Rate)
Set your bitrate based on resolution and framerate:
1080p at 60fps: 6000 Kbps
720p at 60fps: 5000 Kbps
720p at 30fps: 3500 Kbps
Set Keyframe Interval to 2 seconds
Choose "High" for the Profile setting
Adjusting Audio Settings for Clear Sound
Your stream's quality will improve with crystal-clear audio:
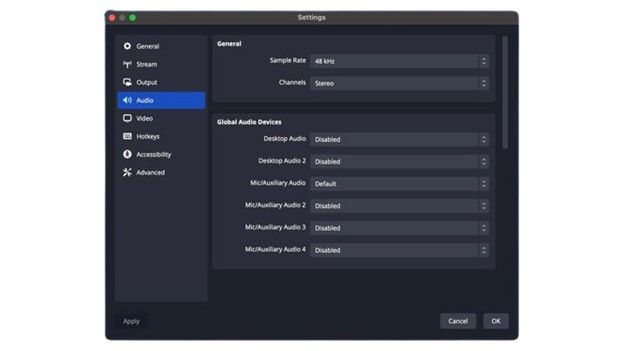
Under Audio settings, set Sample Rate to 48 kHz and Channels to Stereo
In the Audio Mixer, click the gear icon next to your microphone and select "Filters"
Add these filters in sequence:
Noise Suppression (eliminates background noise)
Compressor (creates smooth, even audio)
Gain (increases volume without distortion)
Limiter (prevents audio from peaking, set threshold to -3dB)
Using External Microphones for Better Audio
An external microphone like the Nearstream AM25X can drastically enhance your audio quality. Here’s how to get the best performance from it:
- Connect via USB, then select Nearstream AM25X under Mic/Auxiliary Audio in OBS settings.
- In the Audio Mixer, click the gear icon → Filters:
- Add a Compressor to balance loud and soft sounds.
- Use Noise Suppression to reduce background noise.
- Gain can help if the mic input is too low.
- Consider adding a Pop Filter or shock mount to reduce plosives and vibration noise.
- Test your levels before going live to ensure crystal-clear audio delivery.
Customizing Your Twitch Stream with OBS
Your Twitch stream can become a professional production that grabs viewer attention when you customize its visual elements. OBS Studio gives you powerful tools to make your stream look unique and create an experience viewers won't forget.
Adding Overlays, Alerts, and Widgets
Your stream needs several key elements to look visually engaging:
Adding overlays to OBS is simple:
Click the "+" button in the Sources panel
Select "Image" for static overlays or "Browser Source" for animated ones
Name your source and click "OK"
Browse to find your overlay file or paste the URL for browser sources
Position and resize as needed by clicking and dragging in the preview window
Stream alerts (follows, subscriptions, donations) work differently:
OBS doesn't include built-in alerts but works with third-party services
StreamElements and Streamlabs are great options that let you customize alerts
Once you've designed your alerts on these platforms, copy the provided URL
Add a new Browser Source in OBS and paste the URL
Check "Control audio via OBS" to manage alert sound levels
Right-clicking sources lets you access options for rotation, filters, and positioning order. Browser sources let you show live social media feeds in your scenes, which makes your stream more interactive.
Setting Up Scenes and Transitions for a Professional Look
Each stream segment needs its own layout:
Main Gameplay Scene: Game capture with webcam and minimal overlays
Just Chatting Scene: Larger webcam display with background elements
Starting Soon/Be Right Back: Countdown timers, social media info, and chat display
Creating scene transitions takes just a few steps:
Click "+" under Scene Transitions
Choose a transition type (cut, fade, swipe, slide, stinger)
Adjust transition settings like duration and direction
You can set specific transitions for individual scenes with a right-click
Stinger transitions add a professional touch to your stream. These animated clips play during scene changes. OBS Studio supports hotkeys that let you switch scenes instantly, which adds production value to your live broadcasts.
Studio Mode helps you preview scene changes before your viewers see them. You can access it through the Control dock to make sure everything looks perfect before going live.

Optimizing OBS Stream Quality for Twitch
Stream quality plays a crucial role in keeping viewers engaged on Twitch. Your content might be amazing, but viewers will leave quickly if the video quality is poor. The right OBS settings will give a professional look to your broadcasts and make them available to your audience.
Choosing the Best Bitrate and Encoder Settings
Your streaming resolution and framerate determine the ideal bitrate. Twitch streaming works best with these settings:
1080p at 60fps: 6,000-9,000 Kbps for optimal quality
720p at 60fps: 3,500-4,500 Kbps for balanced performance
720p at 30fps: 2,500-3,000 Kbps for those with limited bandwidth
NVIDIA NVENC should be your encoder choice if you have a compatible graphics card. This moves processing from your CPU to GPU. X264 with the "Quality" preset and "Main" profile works as an alternative. Your keyframe interval should be exactly 2 seconds to ensure viewers get the best experience.

Adjusting FPS and Resolution for Smooth Streaming
Better quality doesn't always come from higher resolution. Games like Overwatch or World of Warcraft can show pixelation during motion, even at high resolution. Many streamers find 720p at 60fps strikes the perfect balance between quality and accessibility.
1080p/60fps streams look great, but your viewers might struggle with higher bitrates. This becomes especially important when you don't have transcoding options, which are mostly available to Partners. Viewers with slower connections often face buffering issues.
Fixing Common Lag and Buffering Issues
Buffering complaints from viewers require you to check for dropped frames in OBS first. These solutions often help:
Lower your streaming bitrate to 2,500-4,000 Kbps
Reduce resolution to 720p if currently at 1080p
Switch from 60fps to 30fps during demanding content
Enable CBR (Constant Bit Rate) instead of VBR
Network setup matters significantly. Wired ethernet connections work better than WiFi, which can be unreliable. Your upload speed should be higher than your chosen bitrate by 35-40% to keep your broadcast stable.
Finding perfect settings takes time and testing. You should run test streams before going live. Watch your VODs to spot quality issues and adjust settings until you find what works best for your content and audience.
Streaming on Twitch with OBS: Testing and Going Live
Your OBS settings configuration must be tested before broadcasting to viewers. This crucial step helps you avoid technical issues and embarrassing moments while making a professional first impression.
Running a Test Stream Before Going Live
A test stream helps identify potential problems without alerting your followers. Twitch offers a straightforward testing process:
Go to inspector.twitch.tv and log in with your Twitch credentials
Click "Run a Stream Test" to generate a test code
Copy the code "?bandwidthtest=true"
Open OBS settings, select Stream and paste this code at the end of your stream key
Click "Start Streaming" to begin your test
You should simulate your actual streaming conditions during this test. Run the same games, turn on your microphone and camera, and add any overlays you plan to use in your live broadcast. Your test results become more accurate when conditions match your actual stream.
Let your test run for 5-10 minutes to gather enough data about bitrate stability and frame rate performance. Twitch Inspector shows these metrics with up-to-the-minute data analysis and highlights concerning fluctuations or drops.
How to Go Live on Twitch Using OBS
Starting your live stream takes just a few steps after successful testing:
Remove the "?bandwidthtest=true" code from your stream key
Check if all scenes and sources appear correctly in your preview
Make sure your microphone isn't muted and audio levels look right
Start any games or applications you'll be streaming
Click the "Start Streaming" button in the OBS control panel
This is exactly how to stream on Twitch with OBS and ensure no surprises.
OBS connects to Twitch automatically and starts broadcasting your content. The status bar at the bottom of OBS helps you track your stream health through frame rate, CPU usage, and bandwidth information.
Simply click "Stop Streaming" when you want to end your broadcast. This action properly disconnects from Twitch and wraps up your stream without technical glitches.
Review your broadcast analytics after each stream to find ways to improve future sessions.
Enhancing Your Stream with Professional Streaming Gear
Good hardware makes the most of your OBS settings. Software setup builds your stream's foundation, but professional equipment improves production value and keeps viewers watching.
Essential Streaming Equipment for Twitch Success
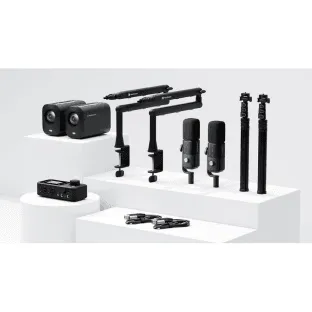
Successful Twitch streamers need four main types of gear:
- Cameras
- Microphones
- Lighting
- Capture Devices
These equipment work together to create broadcasts that stand out. Quality equipment reduces technical problems that could ruin your stream and hurt the viewer's experience.
Webcams & Streaming Cameras for High-Quality Video
Your visual presentation creates a vital connection with viewers. Here's what streamers should think over:
- Entry-level: Logitech C920 – Great for beginners with solid 1080p/30fps video.
- Mid-range: Razer Kiyo Pro – Offers 1080p/60fps and excellent low-light performance.
- Professional: DSLR-quality cameras such as the NearStream 4K Streaming Camera VM20 give you unmatched image clarity and versatility. You can also explore the 10X Optical Zoom Wireless Streaming Camera VM33 for advanced setups with dynamic shots and remote control.
Capture Cards for Console Gamers
Console streamers need capture cards to integrate gameplay into their streaming software.
- External USB Options: Portable and easy to set up. The NearStream 4K60 USB 3.1 Capture Card CCD30 is perfect for Xbox, PS5, Nintendo Switch, and DSLR camera capture with support for 4K input and 1080p/60fps output.
- Internal PCIe Cards: Offer low-latency performance but are generally more expensive and complex to install.
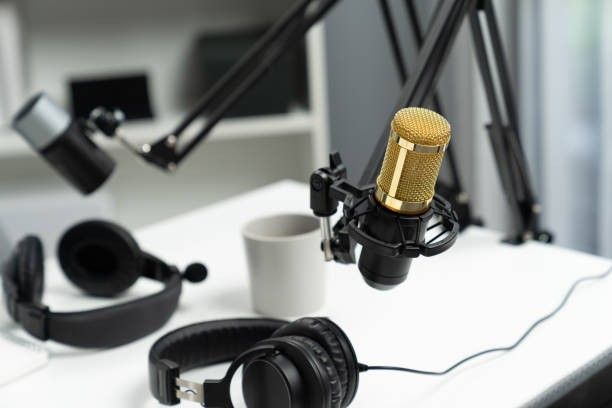
Microphones and Audio Setup for Clearer Sound
Great audio keeps viewers tuned in longer than great video. In fact, most viewers will forgive average visuals—but bad audio is an instant dealbreaker.
Audio quality impacts viewer retention more than anything. You could have crystal-clear video, but if your sound is echoey or full of background noise, people will leave. Here are your best options:
- USB Microphones: Affordable and plug-and-play options like the NearStream AM15X USB Microphone are ideal for new streamers.
- Condenser Microphones: For better sound fidelity, try the NearStream AM25X USB & XLR Condenser Microphone.
- Professional Kits: A full podcast kit includes everything you need, from a mic and boom arm to pop filters and mixers.
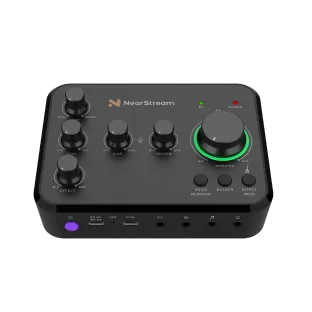
- Audio Interfaces & Mixers: Consider a Portable Audio Mixer to fine-tune your audio levels during live streams.
- Wireless Options: If you move around or host guests, the NearStream AWM20T Wireless Microphone adds flexibility without compromising sound quality.
How a Professional Streaming Kit Can Raise Your Twitch Channel
Streaming success comes down to one thing: viewer retention. A clean, professional stream makes people stay longer and more likely to follow or subscribe. Investing in quality gear helps you:
- Deliver a smoother, more immersive viewing experience
- Build a brand that looks polished and trustworthy
- Avoid common tech issues that frustrate viewers
- Create opportunities for monetization through higher engagement
Starting with a comprehensive Streaming Kit or Game Streaming Kit from NearStream is a smart move if you want to level up without buying everything separately.
Pro Tip: Start with audio upgrades first. Viewers can tolerate lower video quality, but poor audio is an instant dealbreaker.
Troubleshooting Common OBS Streaming Issues
Technical problems can pop up even with a well-configured OBS setup. You need to know how to spot and fix these common problems to keep your Twitch stream running smoothly and your viewers happy.
Fixing Lag and Frame Drops
Your OBS shows "Dropped Frames" in the status bar when your network can't handle your configured bitrate. This usually points to network problems between your computer and Twitch's servers. These problems come from:
Your upload speed doesn't match your chosen bitrate
WiFi connections aren't as reliable as wired ones
Other devices eat up too much bandwidth
Here's what you can do to solve the problems of frame drops:
Use a wired ethernet connection instead of WiFi
Set your video bitrate between 2,500-4,000 Kbps
Turn on network optimizations in OBS through Settings → Advanced → Network and check "Enable network optimizations" and "TCP pacing"
Pick a different Twitch server
Resolving Audio Sync Problems
Video and audio drift apart because OBS uses separate clocks for monitoring and recording audio. This creates sync issues that get worse over time.
These steps will fix your audio sync:
Turn off device timestamps in OBS for audio devices that send wrong timing data
Set a negative sync offset in Advanced Audio Properties (0.5 seconds equals 500ms delay)
The "Edit → Advanced Audio Properties" menu lets you adjust the "Sync Offset" field
You can add a "Video Delay" filter to video sources that need timing fixes
Connection Issues and How to Fix Them
Your stream might disconnect or fail to connect to Twitch because of:
Old network drivers
Firewalls or antivirus software blocking OBS
VPN services getting in the way
Wrong server selection in OBS settings
A quick DNS cache flush often fixes minor connection problems. If problems continue, try turning off your security software briefly to check for conflicts. Setting OBS to "IPv4 Only" in Advanced Network settings might help too.
Advanced OBS Features for Professional Streams
Simple OBS setup is just the start for serious Twitch streamers. Advanced OBS features help create professional broadcasts that go beyond the basics.
Setting Up Alerts and Notifications
OBS Studio's core features don't include stream alerts. Streamers need third-party alert providers through browser sources. The setup process is straightforward. You'll need to visit Streamlabs or StreamElements to customize your alerts. After personalizing notification styles for follows, subscriptions, and donations, copy the browser source URL. Add a new Browser Source in OBS, paste the URL, and select "Control audio via OBS". This lets you manage alert volumes directly in OBS without switching back to the alert dashboard.
These alerts make viewer interactions come alive on screen. New subscriptions become more memorable and interactive moments for your audience.
Stream Deck Integration
Elgato Stream Deck acts as a professional broadcast control panel for your OBS stream setup on Twitch. The device comes packed with OBS-specific actions. You can switch scenes with visual thumbnails and easily control recording and streaming.
The deck lets you adjust audio mixer settings, toggle source visibility, manage studio mode, and control filter activation. Scene transitions are also at your fingertips.
Stream Deck shines with Twitch-specific functions too. You can run advertisements, enable subscriber-only chat, create stream markers, and send preset chat messages with just one button press.
Using Plugins to Extend OBS Functionality
OBS's open-source nature welcomes community-developed plugins that expand its capabilities. Popular plugins include Advanced Scene Switcher which automates scene transitions based on triggers. NDI Technology helps share network audio/video between computers. Source Clone creates duplicates with different filter settings. StreamFX adds advanced visual effects and transitions. The Websocket plugin lets you control OBS remotely from mobile devices or other computers.
Plugin installation is simple. Download the files and place them in the OBS plugins folder (C:\Program Files\Obs-studio\Obs-plugins). The new features appear in the OBS interfac,e ready to use.
These advanced features turn OBS from a simple broadcasting tool into a professional production suite that helps create standout Twitch content.
Conclusion – Mastering OBS for Twitch Streaming
In conclusion, successful Twitch streaming goes beyond talent—it requires technical knowledge, quality gear, and the right tools. OBS Studio offers powerful, professional features for free, making it the go-to software for streamers aiming to deliver smooth, high-quality broadcasts. With the right settings, consistent testing, and reliable hardware, you can stand out and keep your audience engaged. Whether you're streaming at 720p/30fps or 1080p/60fps, a well-optimized setup ensures a seamless experience for your viewers.
Ready to upgrade your stream? Visit Nearstream for top-tier streaming gear and take your Twitch channel to the next level today!
FAQs – OBS Stream Setup for Twitch
New streamers often ask similar questions about setting up OBS for Twitch. Let's look at the most common questions about OBS configuration.
What is the best OBS setup for Twitch streaming?
Your hardware capabilities determine the best OBS setup. Here's what you need for high-quality Twitch streaming:
Encoder: NVENC for NVIDIA GPUs, AMF for AMD GPUs, or x264 for CPU encoding
Rate Control: Set to CBR (Constant Bit Rate)
Keyframe Interval: 2 seconds (critical for proper Twitch playback)
Resolution: 1080p for professional streams, 720p for better performance
FPS: 60fps for smooth motion, 30fps for lower-end systems
Advanced Output Mode gives you better control over stream quality than Simple Mode.
How do I improve the quality of my stream on OBS?
You can boost your stream quality by:
- Use a high-quality camera like the NearStream 4K VM20
- Upgrade your microphone for clear audio, such as the NearStream AM15X USB Mic
- Add proper lighting to improve your video image
- Use scenes and transitions to make your stream more dynamic
- Optimize settings like bitrate, resolution, and FPS based on your system specs and upload speed.
Can I stream on Twitch with OBS for free?
Yes, it is completely free. OBS Studio comes with no watermarks, fees, or commercial restrictions. Streamers call it their go-to software because it's accessible to more people while offering professional features. You get unlimited scenes, transitions, and plugin support without paying anything.
What bitrate should I use to stream on Twitch?
Your resolution and frame rate determine the bitrate:
1080p at 60fps: 6,000-8,000 Kbps (6,000 Kbps is Twitch's recommended maximum)
1080p at 30fps: 4,500 Kbps
720p at 60fps: 3,500-4,500 Kbps
720p at 30fps: 3,000 Kbps
480p or lower: 1,200-2,500 Kbps
Your internet upload speed should be 35-40% higher than your chosen bitrate for stable streaming. Non-partner streamers should stay at or below 6,000 Kbps. This helps viewers without transcoding options watch without buffering.