


Creating a professional podcasting setup can seem complex, but with the right equipment and steps, you can achieve a seamless experience. This guide outlines the essential equipment, installation steps, and key software tips for setting up a 1-person (1P), 2-person (2P), or 4-person (4P) podcasting environment.
Equipment Setup
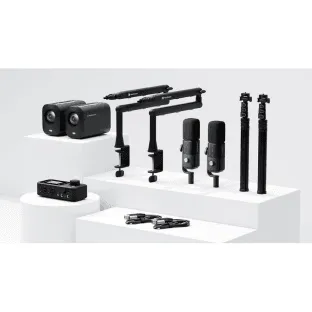
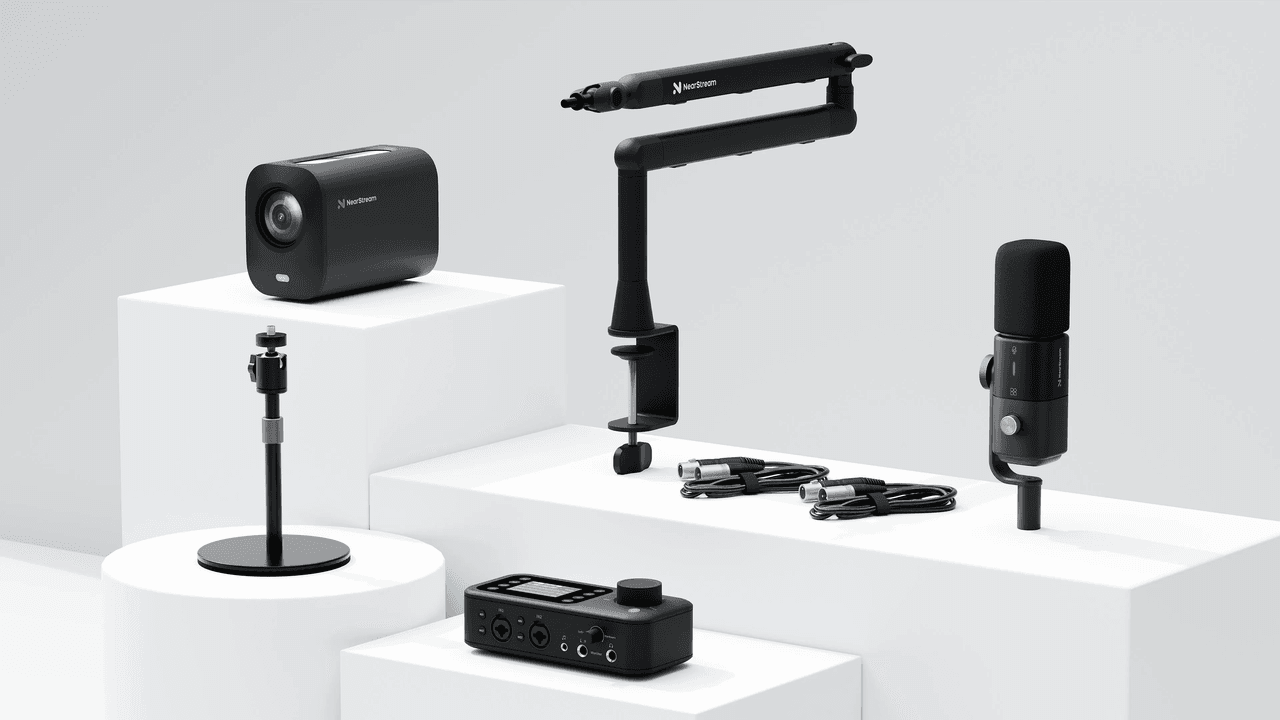
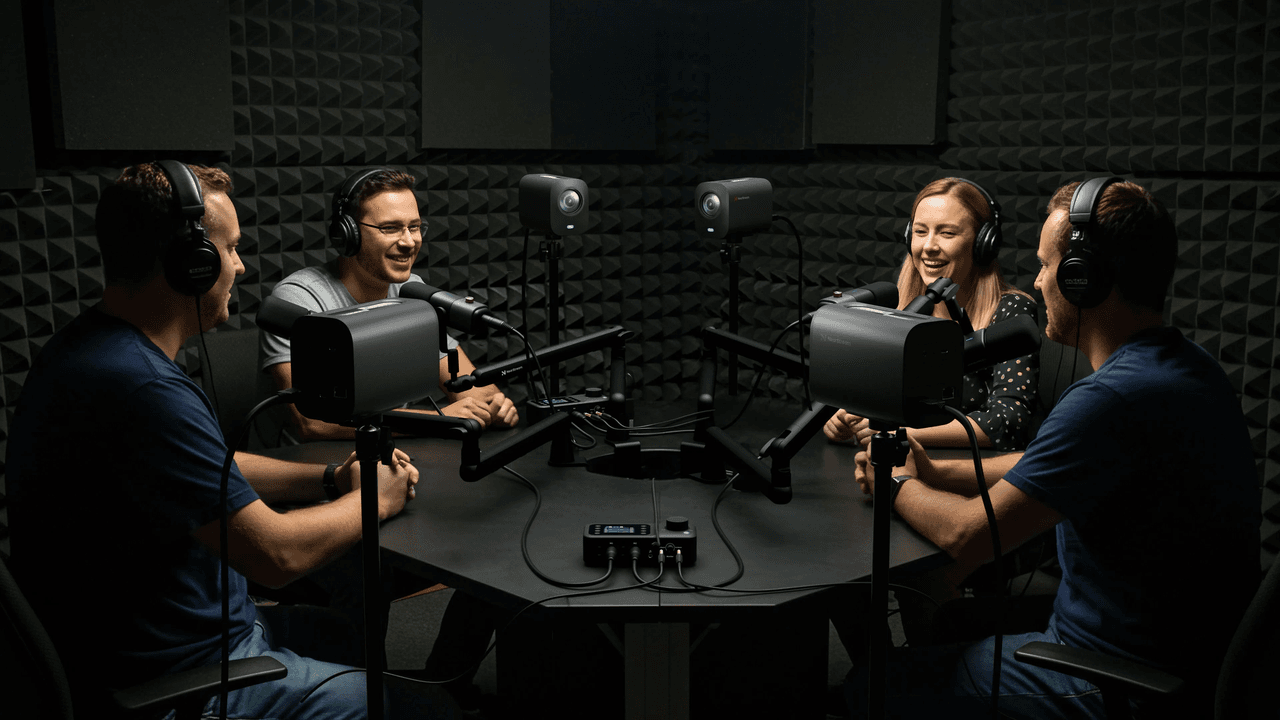
Building a professional podcast studio starts with the right equipment. Whether you’re recording a solo podcast (1P), a two-person conversation (2P), or a four-person panel (4P), having the correct cameras, microphones, and audio mixers will ensure crisp audio and clear video. This section will walk you through the essential gear you need and how to set it up for a seamless podcasting experience.
1P Podcasting Setup
Required Equipment:
VM20 Camera x1
AM25X Condenser Microphone x1
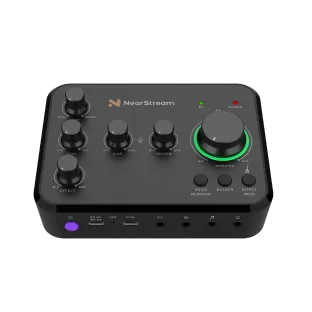
AMIX40U Audio Mixer x1
ST20 Boom Arm Stand x1
XLR Line x2
Camera Stand x1
Steps:
Software Installation:
Download NearSync for device management and firmware updates: Download NearSync
Install OBS or other streaming software on your computer.
Hardware Installation:
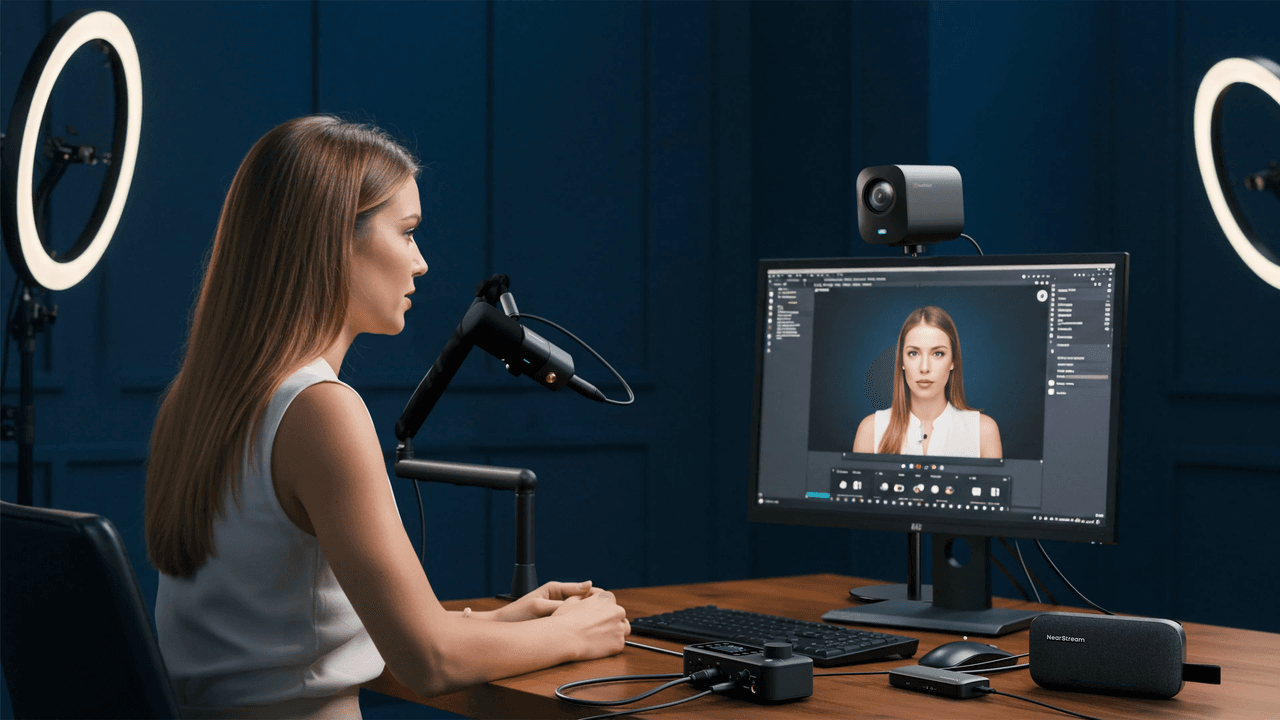
Mount the VM20 camera on a stand positioned at eye level in front of you.
Place the AM25X microphone on the ST20 boom arm stand, positioned to capture your voice clearly. Connect the microphone to the AMIX40U audio mixer’s IN1 input via an XLR line.
Connect the AMIX40U to your computer via a USB cable.
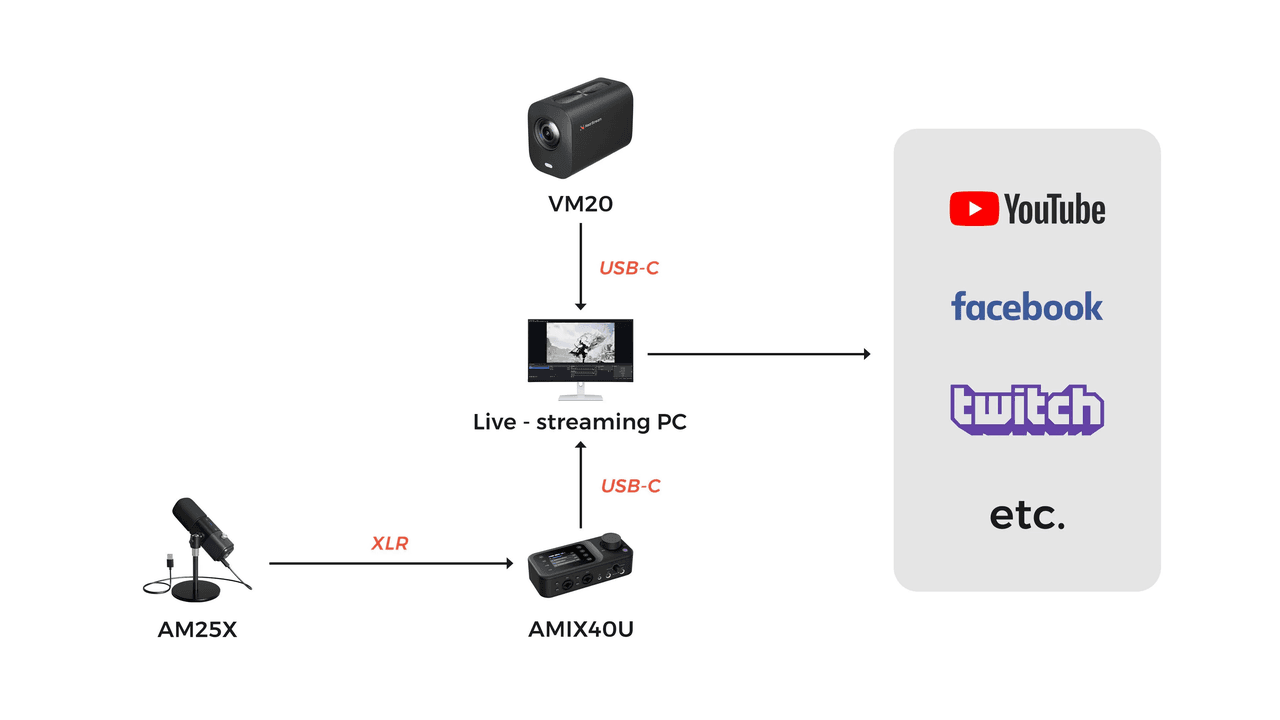
Starting the Podcast:
Open NearSync, update firmware, and configure device settings.

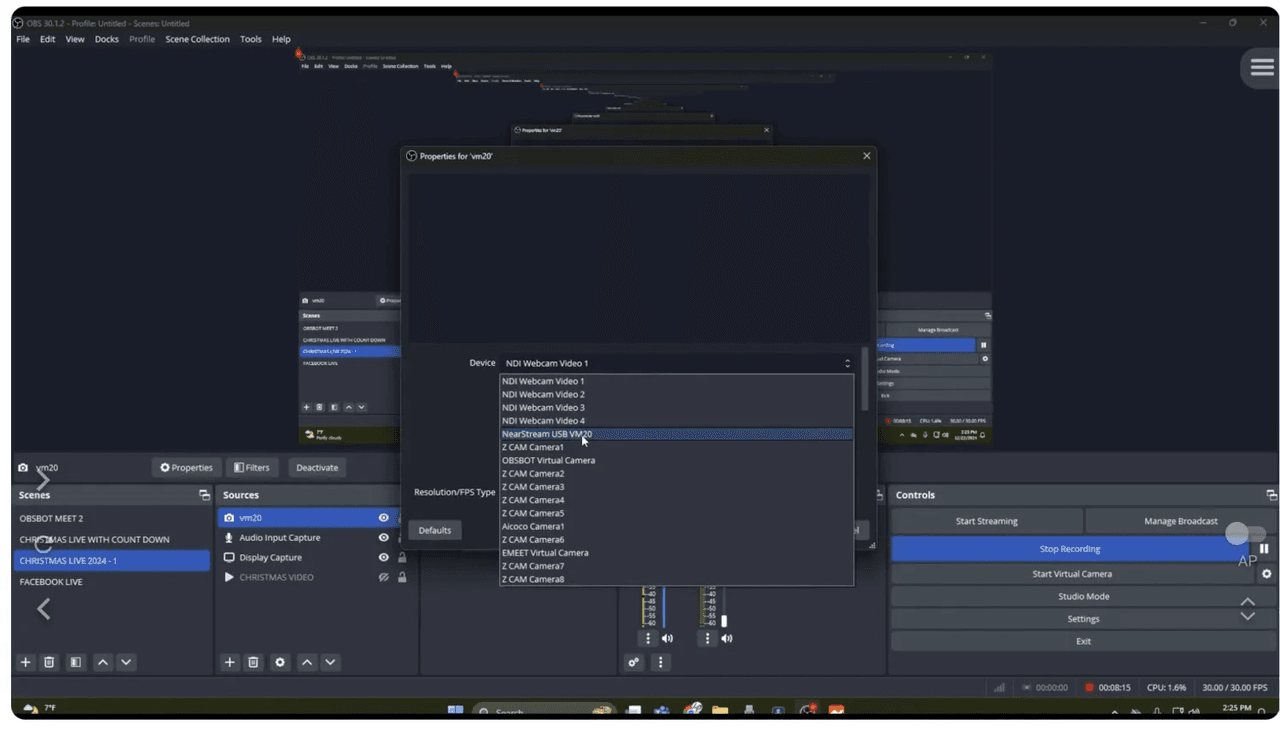
In OBS, add a video capture source, selecting "VM20" as the device and setting the preset to "High."

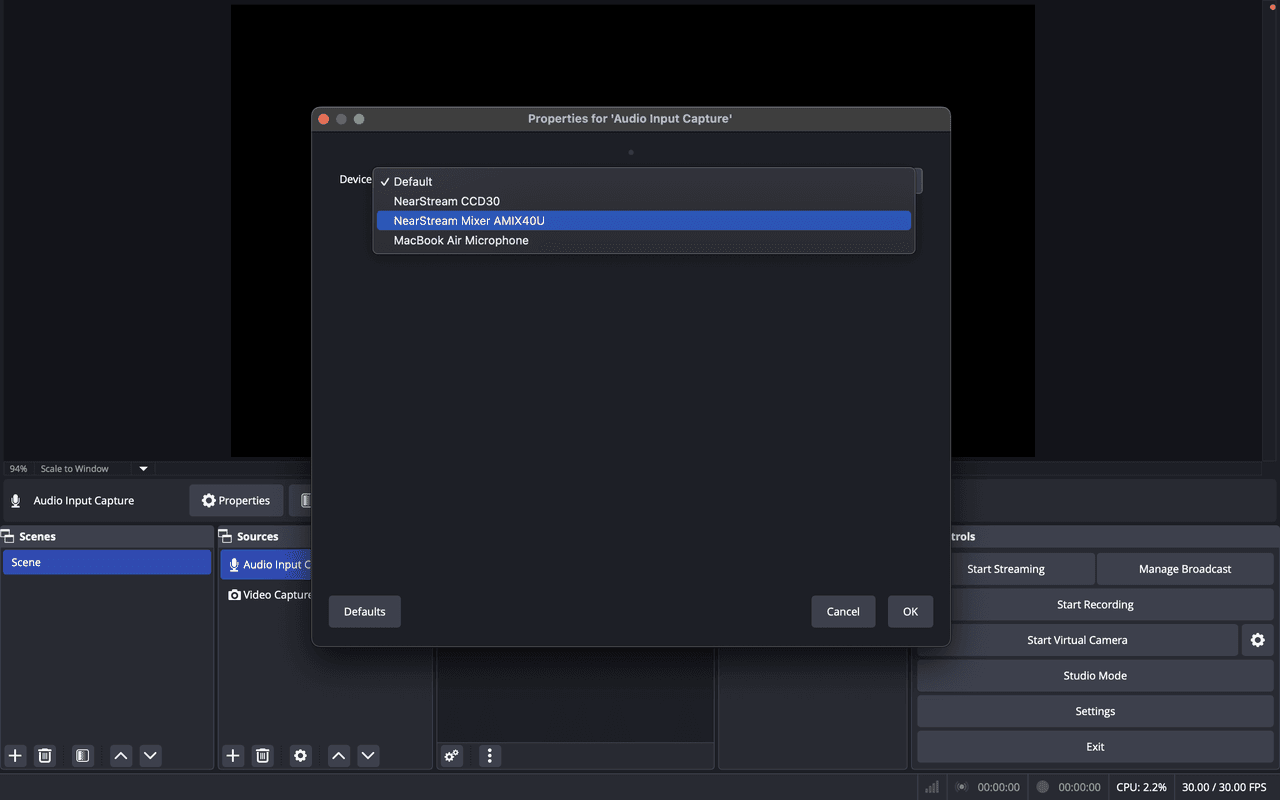
Add an audio input source, selecting "AMIX40U" as the device.
Start streaming or recording as needed.
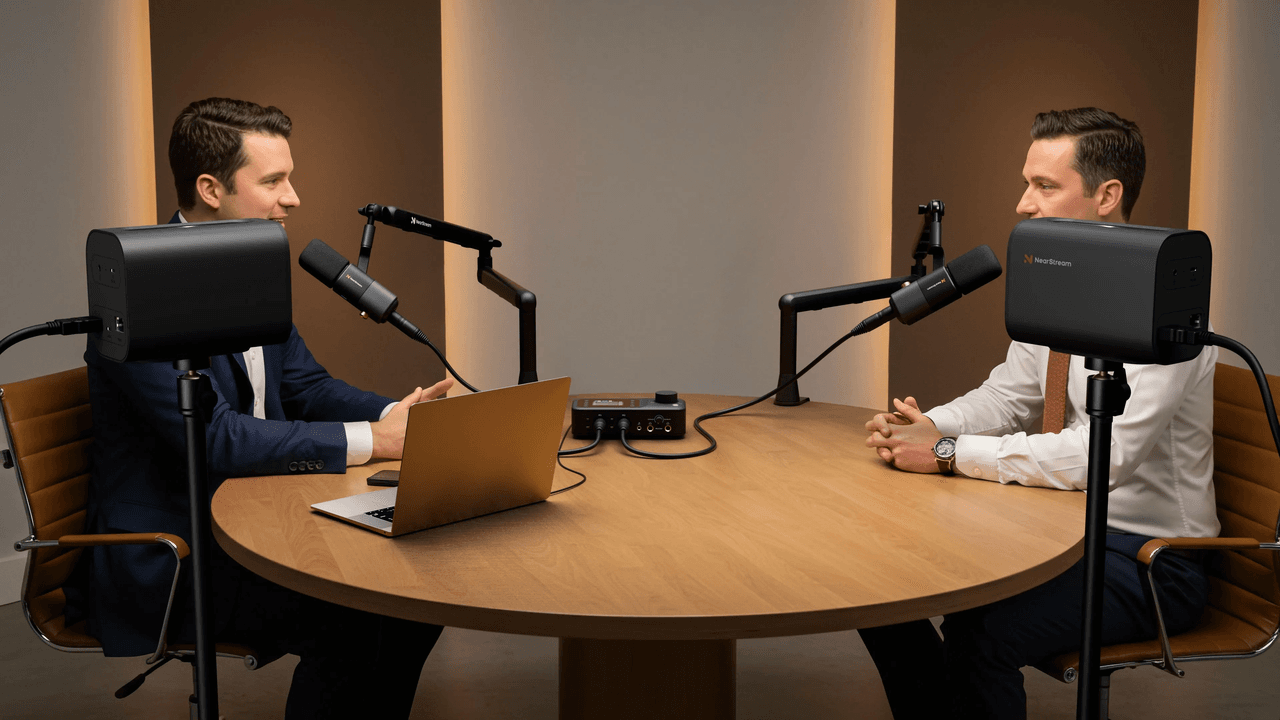
2P Podcasting Setup
Required Equipment:
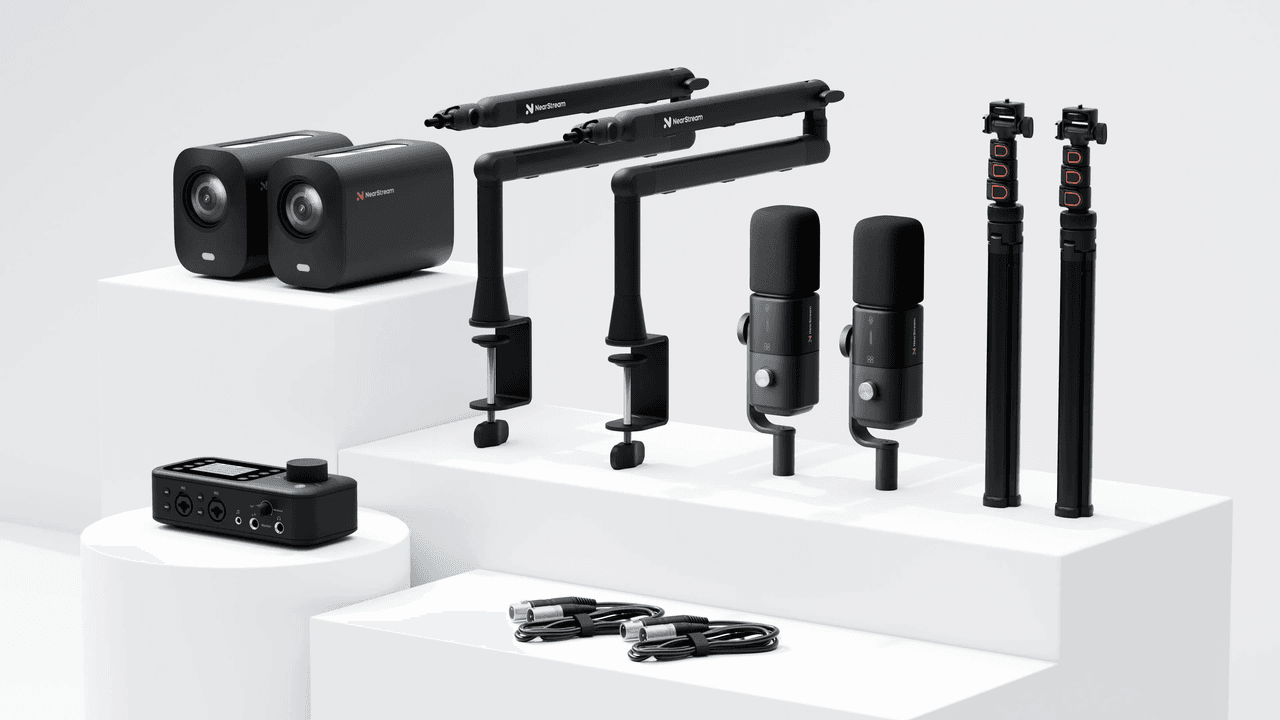
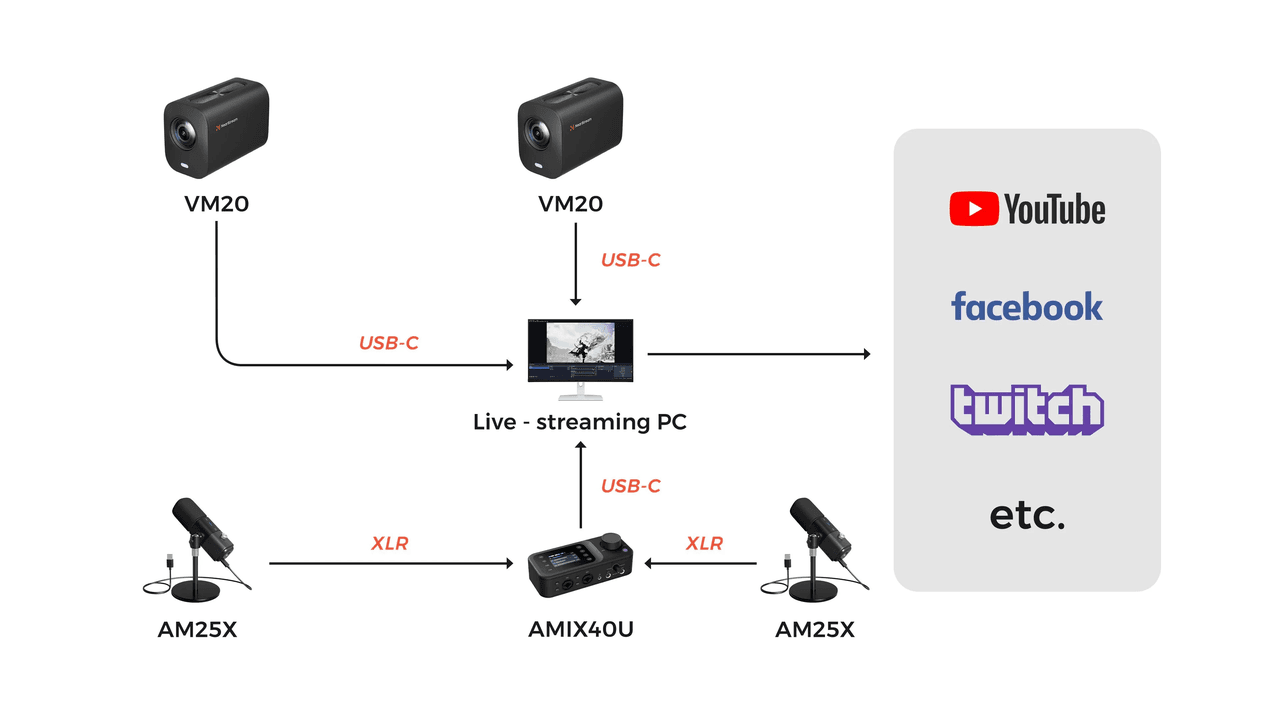
VM20 Camera x2
AM25X Condenser Microphone x2
AMIX40U Audio Mixer x1
ST20 Boom Arm Stand x2
XLR Line x2
Camera Stand x2
Steps:
Software Installation:
Download NearSync for device management and firmware updates.
Install OBS or other streaming software on your streaming computer.
Hardware Installation:
Position one VM20 camera on each side to capture both podcasters’ faces. Connect each camera to the computer via USB cables.
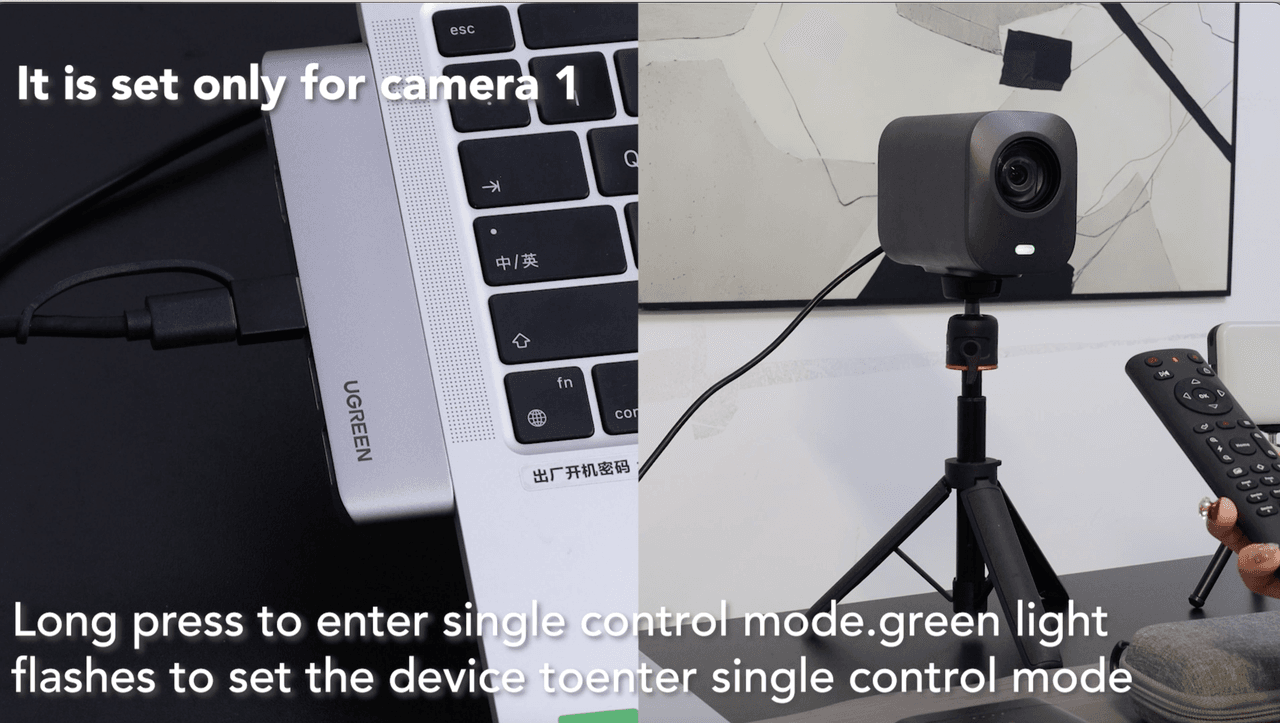
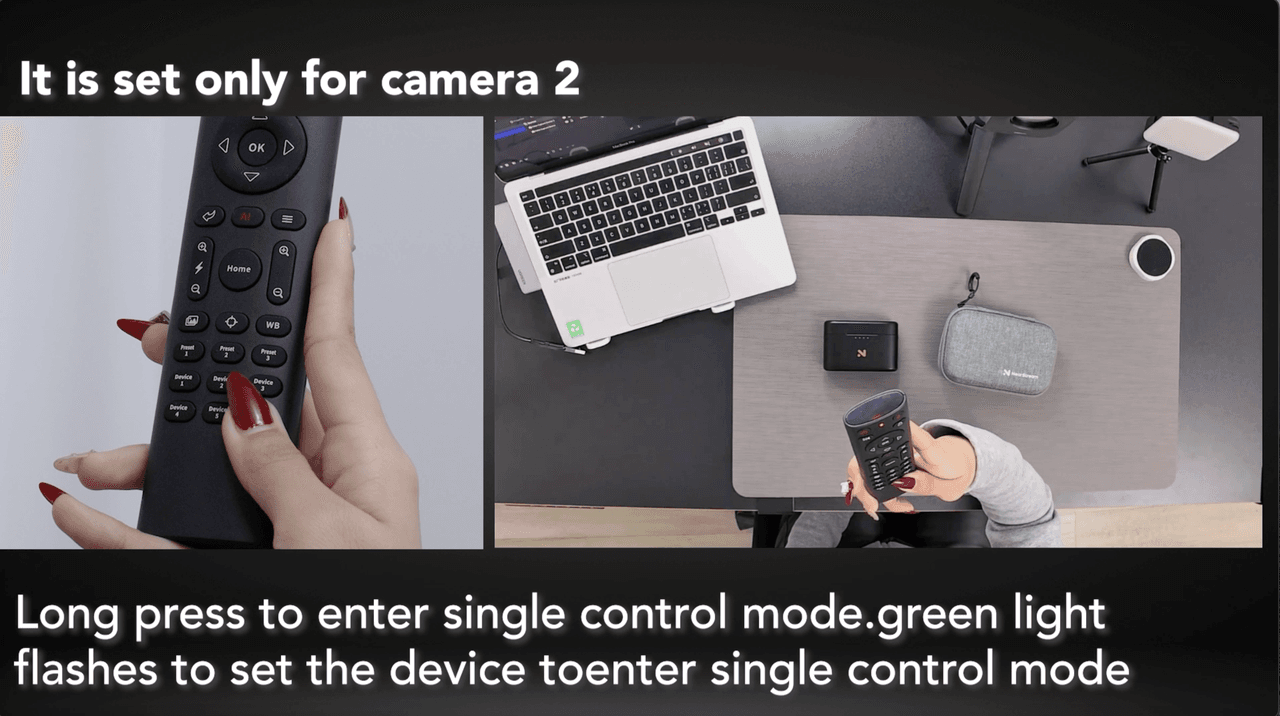
Using the remote control, set each VM20 camera to "Device1" and "Device2."
Notice: Disconnect other cameras when setting up each camera.
Position the AM25X microphones on ST20 stands and connect them to the AMIX40U’s IN1 and IN2 ports.
Connect the AMIX40U to the computer using a USB cable.
Starting the Podcast:
Open NearSync, update firmware, and adjust device settings.
In OBS, add two video capture sources, selecting "VM20" with presets set to "High."
Add an audio input source, selecting "AMIX40U" as the device.
Start streaming or recording as needed.
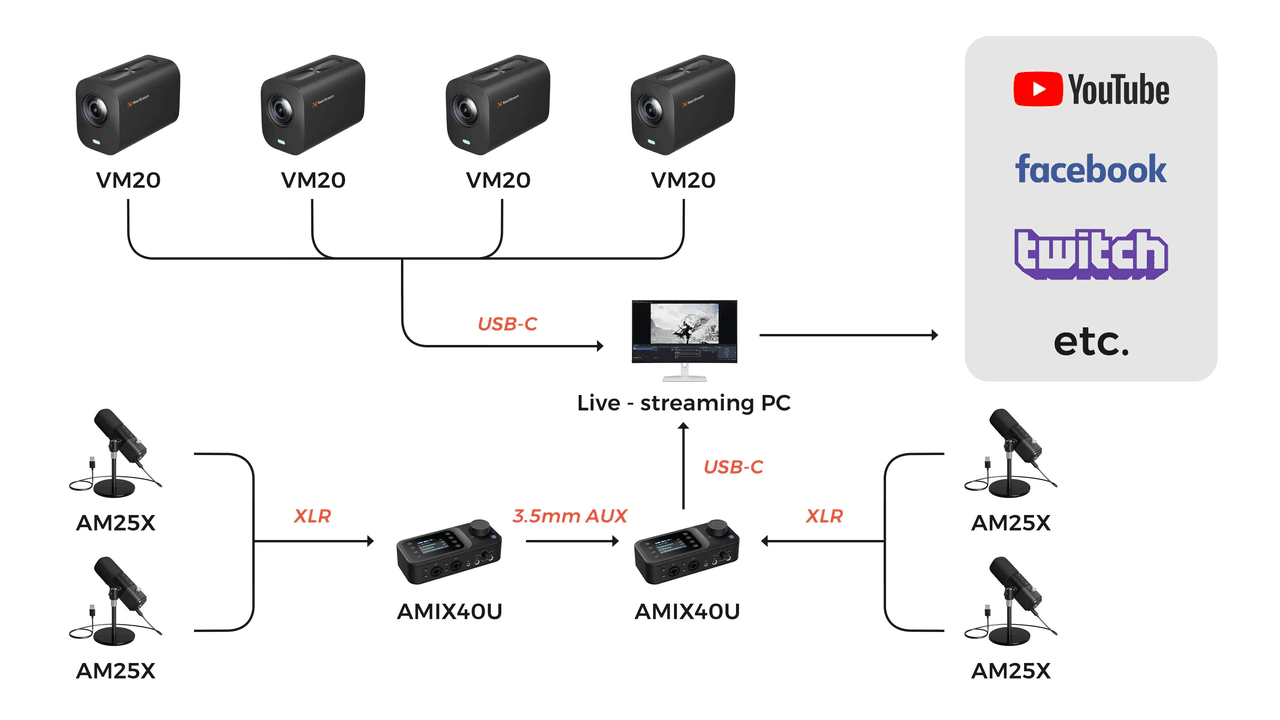
4P Podcasting Setup
Required Equipment:
VM20 Camera x4
HDMI Switcher (with Controller) x1
CCD30 Capture Card x1
AM25X Condenser Microphone x4
AMIX40U Audio Mixer x2
ST20 Boom Arm Stand x4
XLR Line x4
Camera Stand x4

Steps:
Software Installation:
Download NearSync and install OBS on your computer.
Hardware Installation:
Position four VM20 cameras on stands to capture each participant’s face.
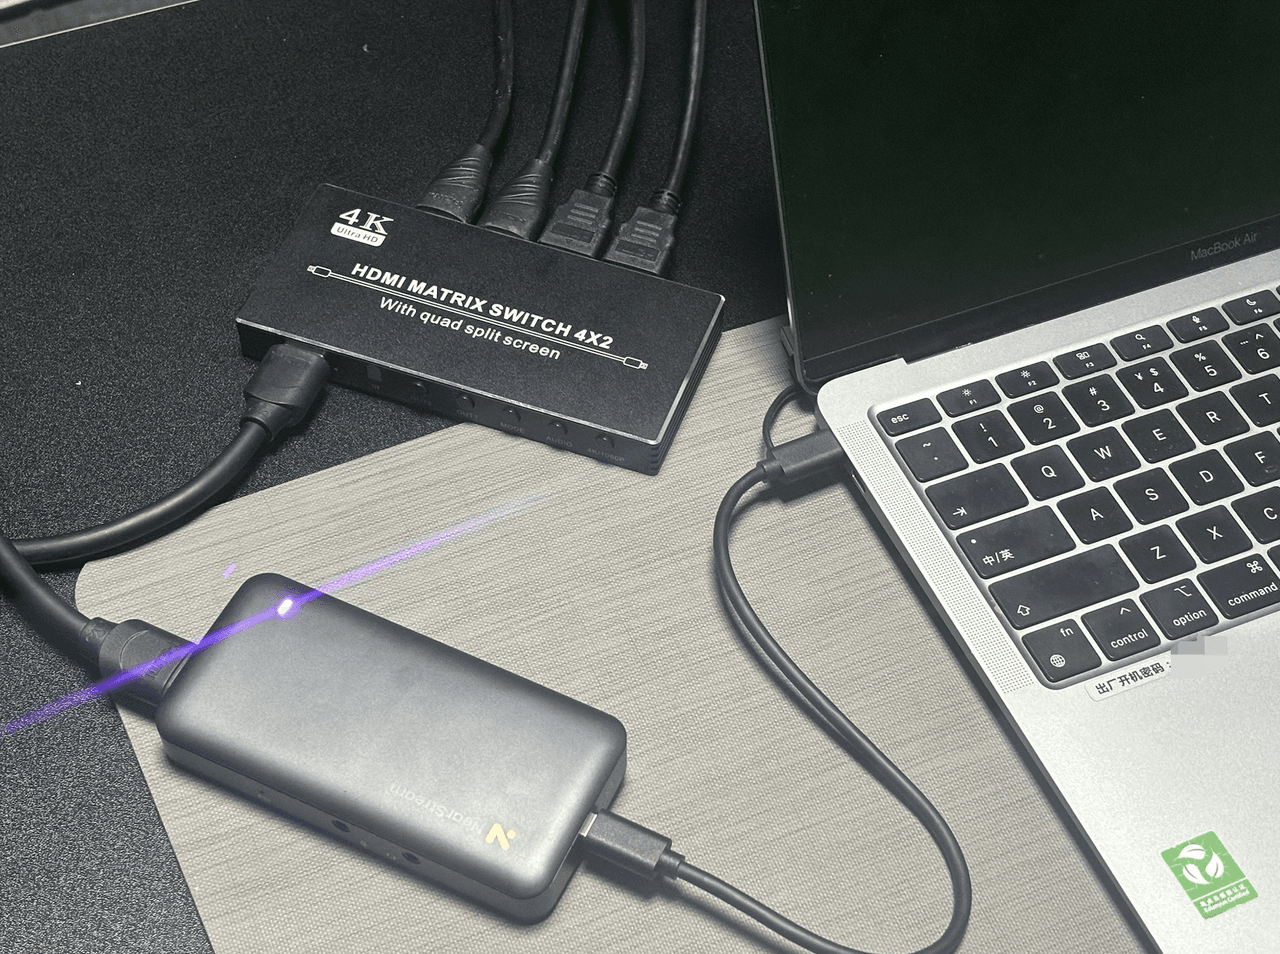
Connect the cameras to an HDMI switcher, then connect the switcher to a CCD30 capture card linked to your computer.
Using the remote control, set each VM20 camera to "Device1" and "Device2." Repeat this process if you have more devices.
Notice: Disconnect other cameras when setting up each camera.


Mount the four microphones on stands, connect them to the IN1 and IN2 inputs of the two AMIX40U mixers using XLR cables, and organize the cables with Cable Clips. Use a 3.5mm AUX cable (included in audio mixer package) to link the two mixers, then connect the mixer to the computer via USB.
Connect the mixers to your computer via USB.
Starting the Podcast:
Open NearSync to update firmware and preset settings.
In OBS, add a video capture device, selecting "CCD30 Capture Card" as the device.

Add an audio input source, selecting "AMIX40U."

Start streaming or recording as needed.
Device Usage Tips
Once your equipment is set up, understanding how to maximize its performance is key to producing a high-quality podcast. From adjusting your VM20 camera’s display settings to fine-tuning your AM25X microphone and AMIX40U mixer, mastering your devices will give you full control over your podcast’s sound and video quality. This section will cover key tips to help you get the best results from your equipment.
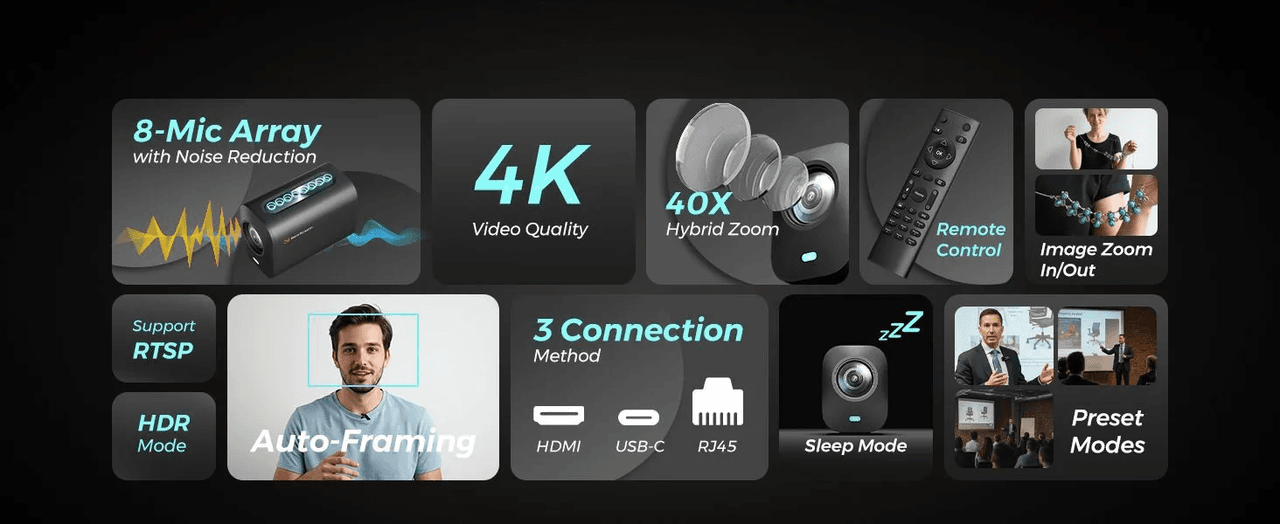
VM20 Camera Tips
Display Settings via Remote:
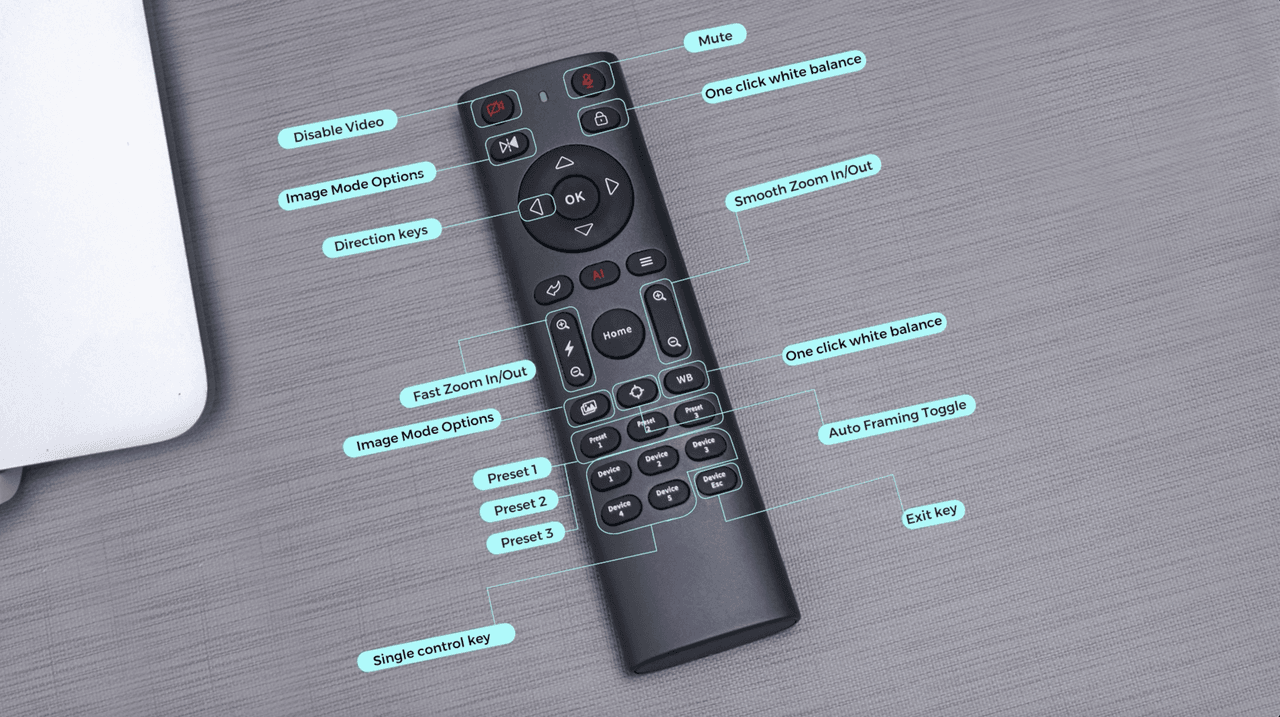
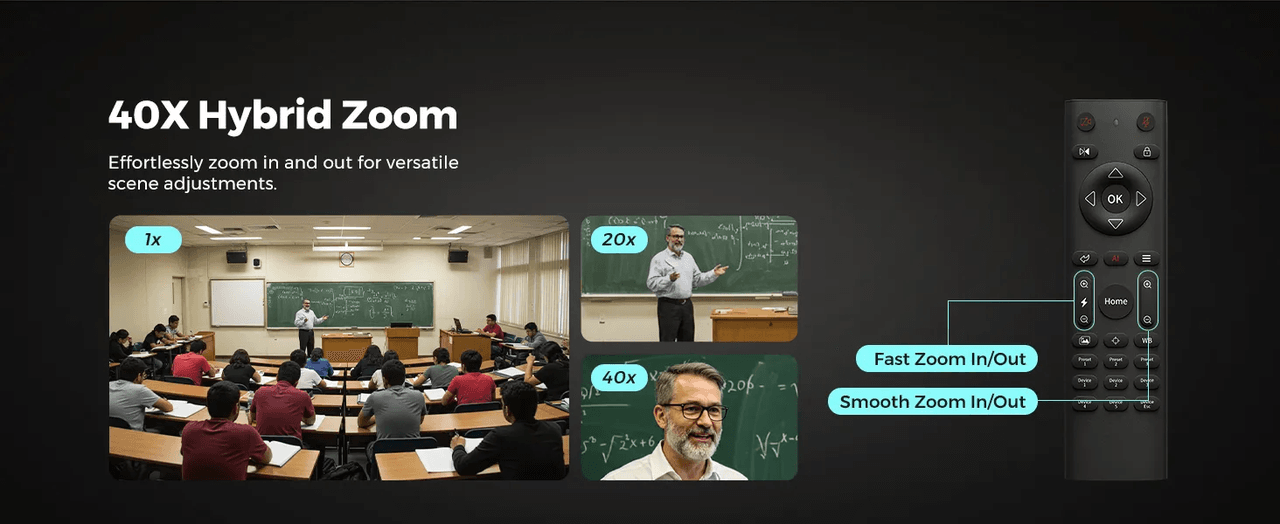
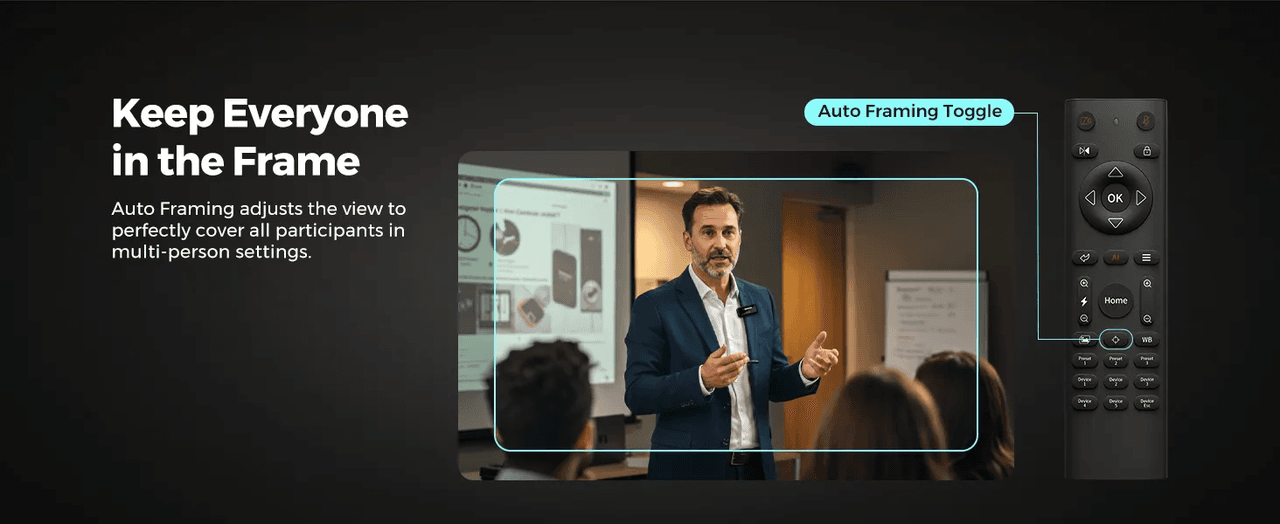
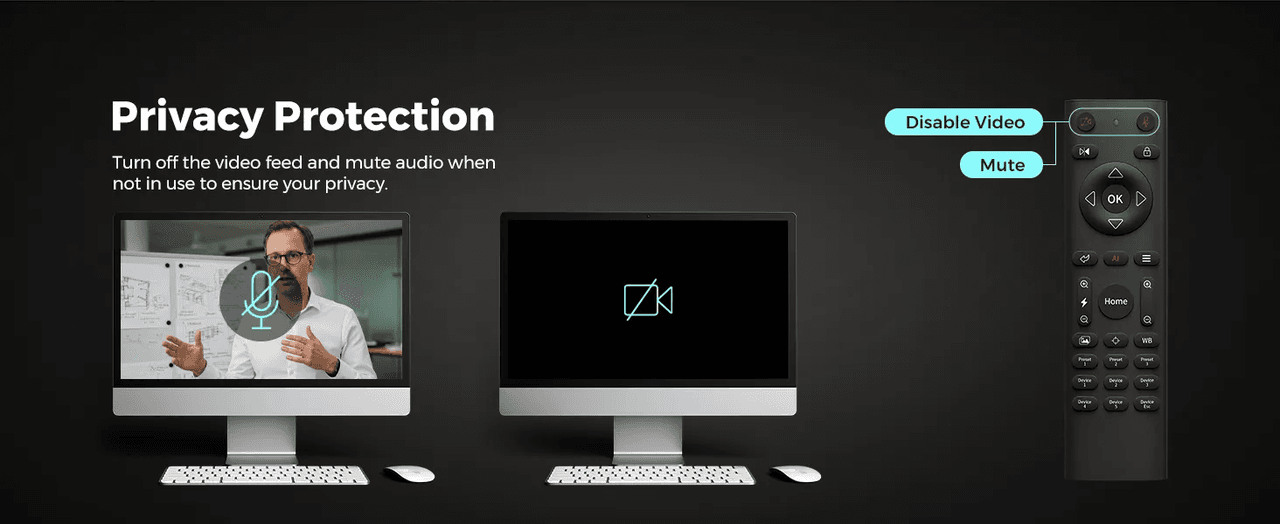
Adjust zoom, auto-framing, and privacy protection with the remote control.
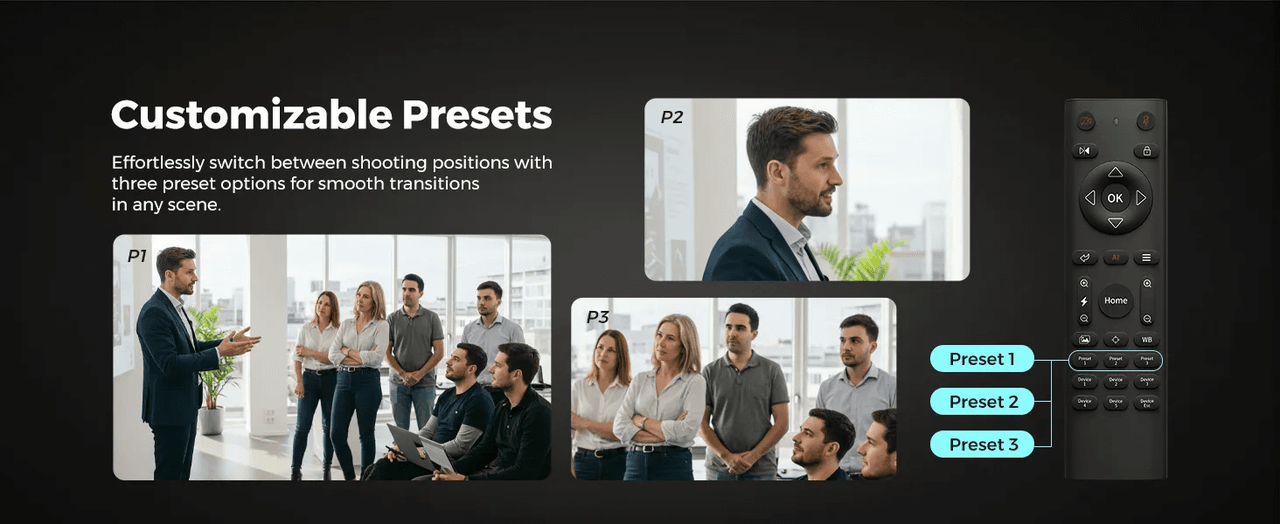
Use the customizable presets to quickly switch between different shooting modes.
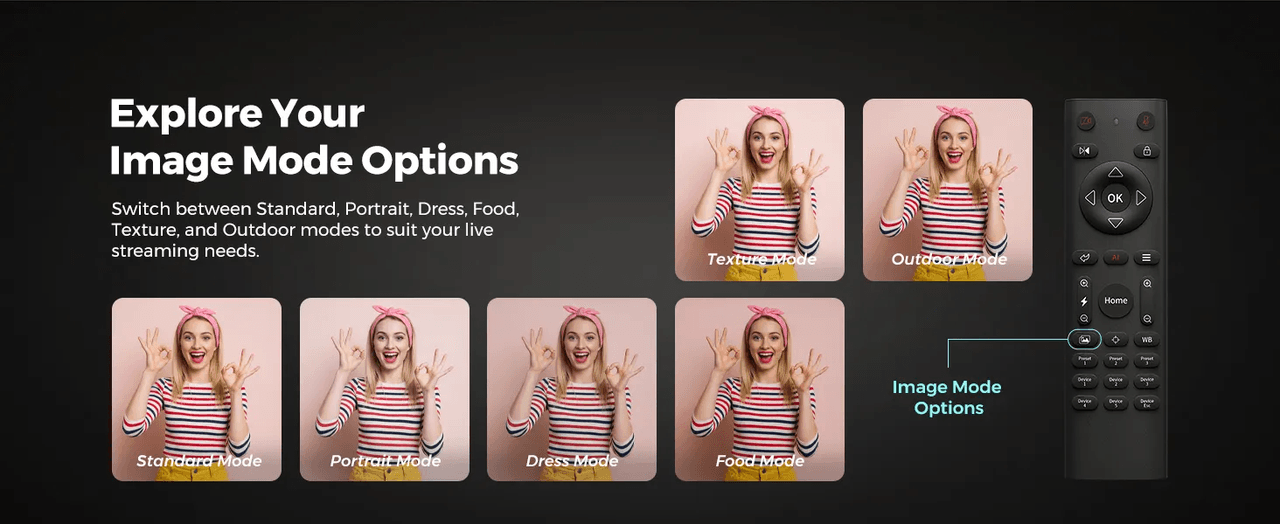
Select image modes (e.g., bright, normal, low-light) based on your lighting conditions.
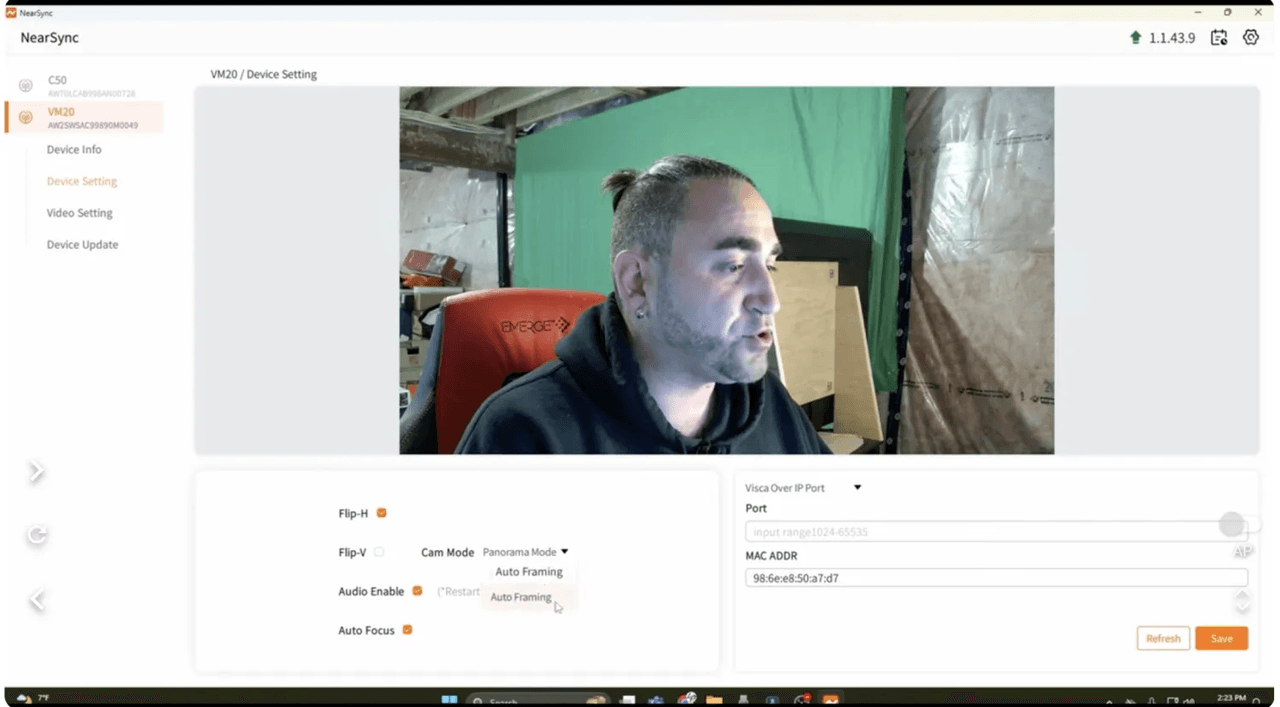
Display Settings via NearSync:
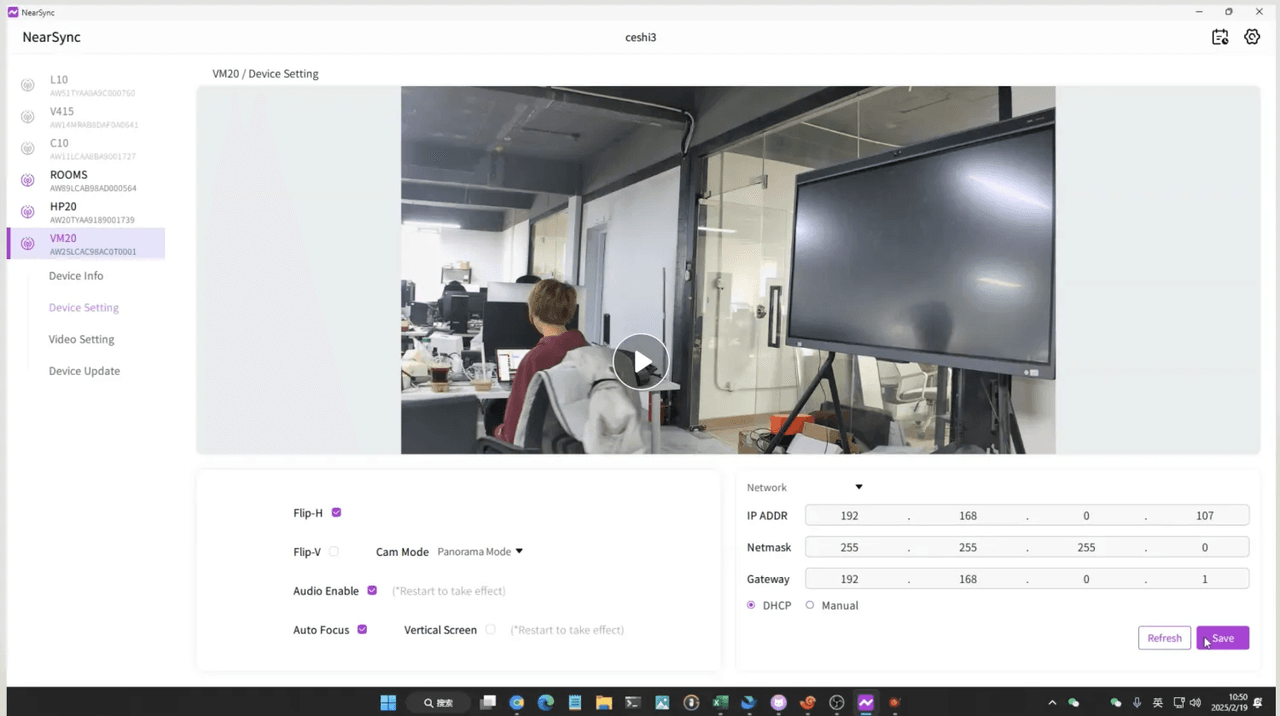
Device setting

Video setting
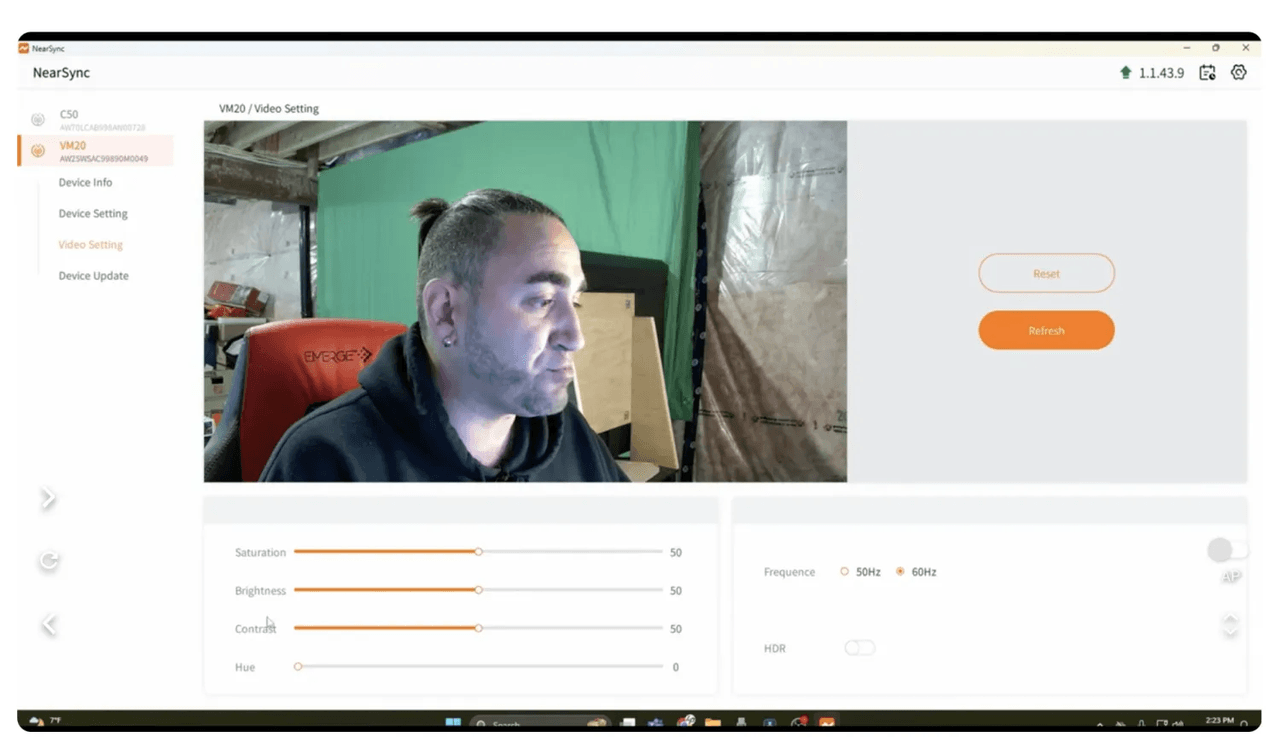
Network connection
Make sure you have an Ethernet cable (RJ45 connector on both ends).
Use an Ethernet cable to connect the VM20 to the router.
Use USB/OTG cable to connet the VM20 and your PC.
Use the NearSync app to detect the VM20's IP address. The default IP address is 192.168.0.86. Click 'Auto Obtain' and then click 'Refresh' after noting the camera’s IP address. You can then disconnect the USB cable.
Connect to OBS/Riverside
AM25X Microphone Tips
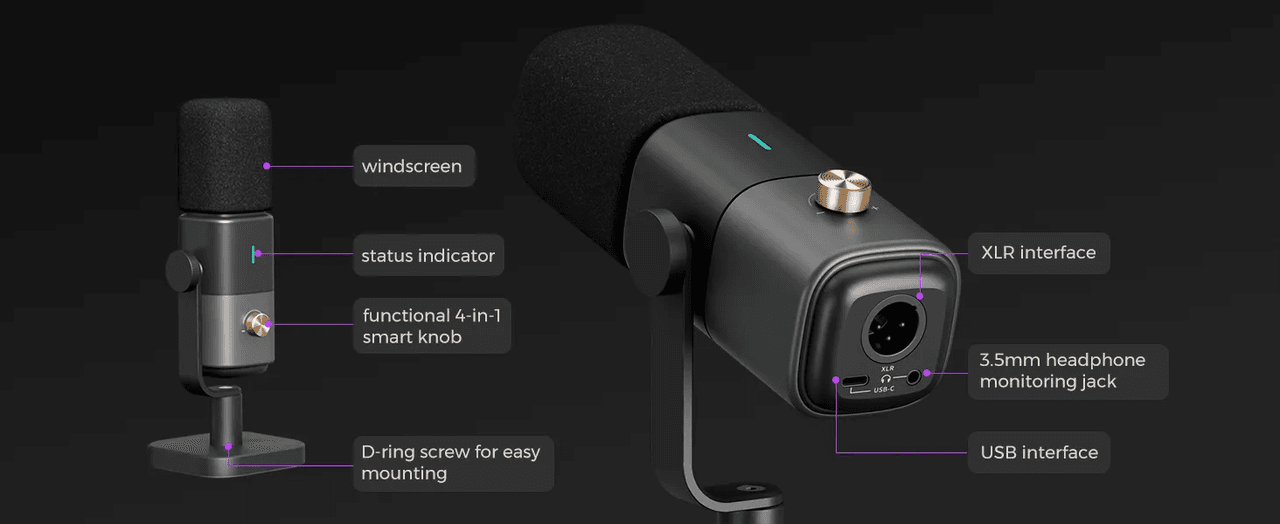
Power
Power Supply
USB Connection: Use the included USB cable to connect the microphone's USB-C port to a computer or any compatible device.
XLR Connection: For use with an external mixer or sound card, connect the microphone to an XLR interface.
Power On/Off
USB Power On: After connecting one end of the USB cable to your computer or device and the other to the microphone’s USB-C port, the microphone will automatically power on.
XLR Power: If using an XLR connection, the microphone receives power directly from the connected mixer or audio interface.
Basic Settings
Mute Function
Mute On/Off: Press the mute button for a short time to toggle the mute function. The microphone will enter mute mode, indicated by a solid red light on the status indicator.
Noise Cancelling On/Off: Press the mute button for a long time to turn the noise cancellation on or off. When noise cancellation is on, the status indicator will show a solid blue light.
Knob Gain Adjustment
Adjust Volume: Use the knob to adjust the microphone's audio gain. Turn the knob left to decrease the volume and right to increase the volume.
Monitoring Function
Switch to Monitoring Mode: Press the mode button briefly to switch between microphone and monitoring modes. When in monitoring mode, the status indicator will show a solid green light.
Device Management on NearSync

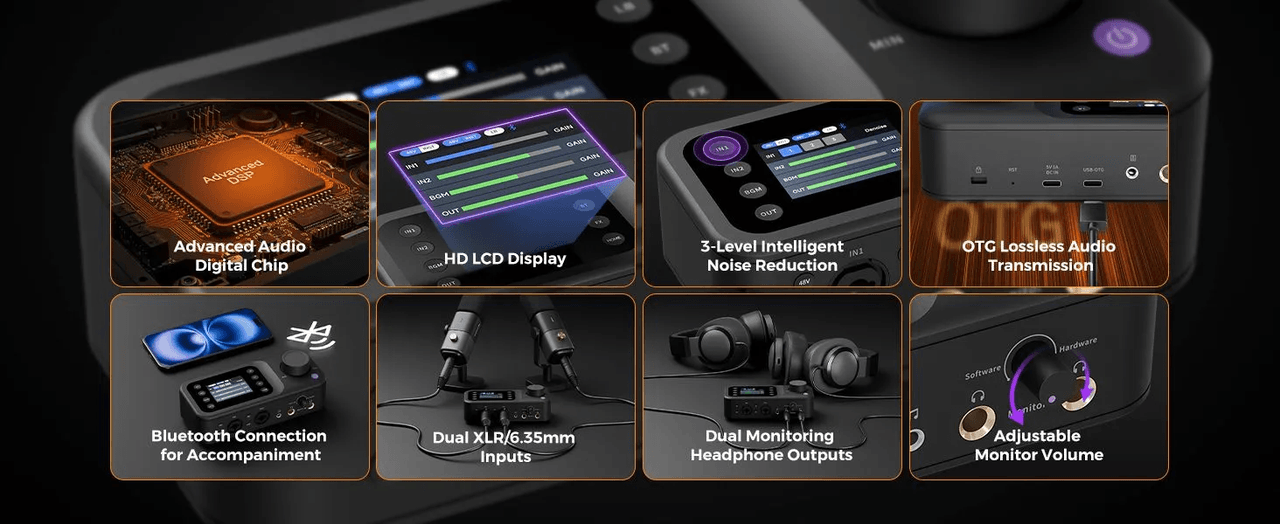
AMIX40U Mixer Tips
Power
Power Supply
Use the included USB cable to connect the mixer’s OTG USB-C port to a mobile phone, computer, or other device. If the device’s USB output power is below 1A, connect an external adapter to the mixer’s 5V-1A port for additional power.
For mobile phone use, connect an external adapter to the mixer’s 5V-1A port to ensure sufficient power and prevent malfunctions caused by the phone’s inadequate power supply.
Power On/Off
Connect one end of the USB cable to the mobile phone or computer and the other end to the mixer’s OTG/5V-1A port. The mixer will turn on automatically.
After the mixer is on, long press the power button to turn it off or back on.
Basic Functions
Audio In Settings
For a Condenser Microphone:
Connect the microphone to the mixer's MIC1&2 Combo input port using an XLR cable.
Enable 48V phantom power on the mixer.
Ensure the INST button is turned off.
For a Dynamic Microphone:
Connect the microphone to the mixer's MIC1&2 Combo input port using an XLR cable.
Keep 48V phantom power off to avoid damaging the dynamic microphone.
Ensure the INST button is turned off.
For a Musical Instrument:
Connect the instrument to the mixer's MIC1&2 Combo input port using a 6.35mm cable.
Keep 48V phantom power off to avoid damaging the instrument.
Turn on the INST button to match the input impedance for the instrument.
For IN1&2 input channels:
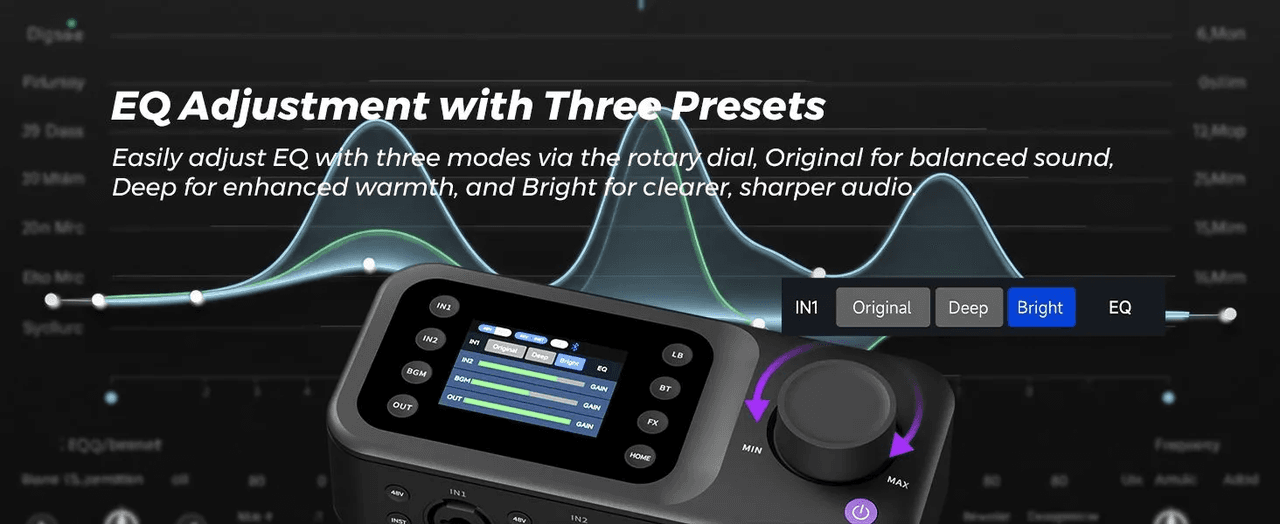
Short press the IN1&2 button to activate the current channel; short press it again to switch to Gain/Equalizer/Noise Reduction/Reverb mode.
After selecting the current channel mode, use the right knob to adjust the gain or switch effects.
Long press the IN1&2 button to mute the selected channel (only valid in gain adjustment mode)
Background Music Settings
Short press the BGM button to activate the current channel; short press again to switch between different BGM channels -- USB OTG/Bluetooth/AUX IN.
After selecting the corresponding BGM channel, rotate the knob to adjust the BGM gain.
Long press the BGM button to mute the selected BGM channel.
Audio Out Settings
Audio output channels include:1*6.35mm Line out L + 1*6.35mm Line out R , 1*3.5mm Line out , 2*6.35mm Headphone Monitor out.
Short press the out button to select the current channel, short press again to switch between line out, monitor 1, monitor 2 channels.
Rotate the output knob to adjust the selected output channel volume.
Rotate the monitor knob to adjust the software and hardware monitoring volume (rotate left to increase the software monitoring volume and decrease the hardware monitoring volume; rotate right to increase the hardware monitoring volume and decrease the software monitoring volume)
Long press the out button to mute the selected channel.
FX Function
After selecting the BGM channel, short press the FX button to turn on/off the ducker function; long press the FX button to turn on/off the Vocal Remover function.
Bluetooth Function
Short press the BT button to turn on Bluetooth and enter pairing mode. The Bluetooth icon will flash white quickly. On your mobile device such as a mobile phone or computer, go to Settings > Bluetooth > Select NearStream Bluetooth AMIX40U and click Connect. After the connection is successful, the Bluetooth icon will turn blue and stay on.
After the Bluetooth connection is successful, short press the BT button to disconnect or reconnect the Bluetooth connection with the mobile device.
Loopback Function
Short press the LB button to toggle the Loopback function. When enabled, audio from connected devices (e.g., phone/computer via OTG) mixes with microphone and instrument inputs and is sent to the remote end. When disabled, audio from connected devices is not transmitted to the remote end.
When the Loopback is enabled, the LB icon stays blue; when disabled, it stays white.
Connection Way
Microphone and Instrument
Microphone: Connect the mixer’s XLR/6.35mm combo input port to the microphone output port using an XLR-XLR cable.
Instrument: Connect the mixer’s XLR/6.35mm combo input port to the instrument output port using a 6.35mm TS-TS cable.
Mobile Phone/Computer
Connect the mixer’s OTG port to the mobile phone/computer USB port for live streaming. (For mobile phones, use an external adapter to connect the mixer’s 5V-1A port for power.)
Streaming Methods
Live stream via the mixer’s OTG port.
Live stream via the 3.5mm Aux out connected to the mobile phone/computer 3.5mm port using a TRS-TRRS cable.(TRS-mixer , TRRS-mobile phone/computer)
Background Music Input
Bluetooth
OTG-USB
3.5mm Aux In: Use a TRS-TRS cable to connect the mobile phone/computer 3.5mm output port.
Local Speaker
6.35mm Cable: Connect the mixer’s 6.35mm Line out L+R output to the speaker input.
3.5mm Cable: Connect the mixer’s 3.5mm Aux out output to the speaker input.
Monitor Headphone
The mixer’s 6.35mm Monitor 1 & 2 output ports support connection to two 6.35mm monitoring headphones.
For 3.5mm monitoring headphones, use a 6.35mm male to 3.5mm female adapter.
Firmware Upgrade
Connect the mixer’s 5V-1A port to the computer’s USB port using a USB cable and turn it on.
Visit https://www.nearstream.us/NearSync, download the NearSync upgrade tool (Win/Mac), and install it.
Open NearSync after installation, locate the AMIX40U device, select Device Update, click Update, and wait for the upgrade to complete. The mixer will restart automatically.
Podcasting with OBS & Riverside
Choosing the right software is essential for both recording and streaming. OBS and Riverside are two of the most popular platforms for podcasters, each offering unique features that can enhance your recording and broadcasting experience. This section will provide a detailed guide on setting up and using OBS and Riverside for solo, dual, and multi-person podcasts, ensuring smooth operation and professional results
Podcasting with OBS
1P Podcasting
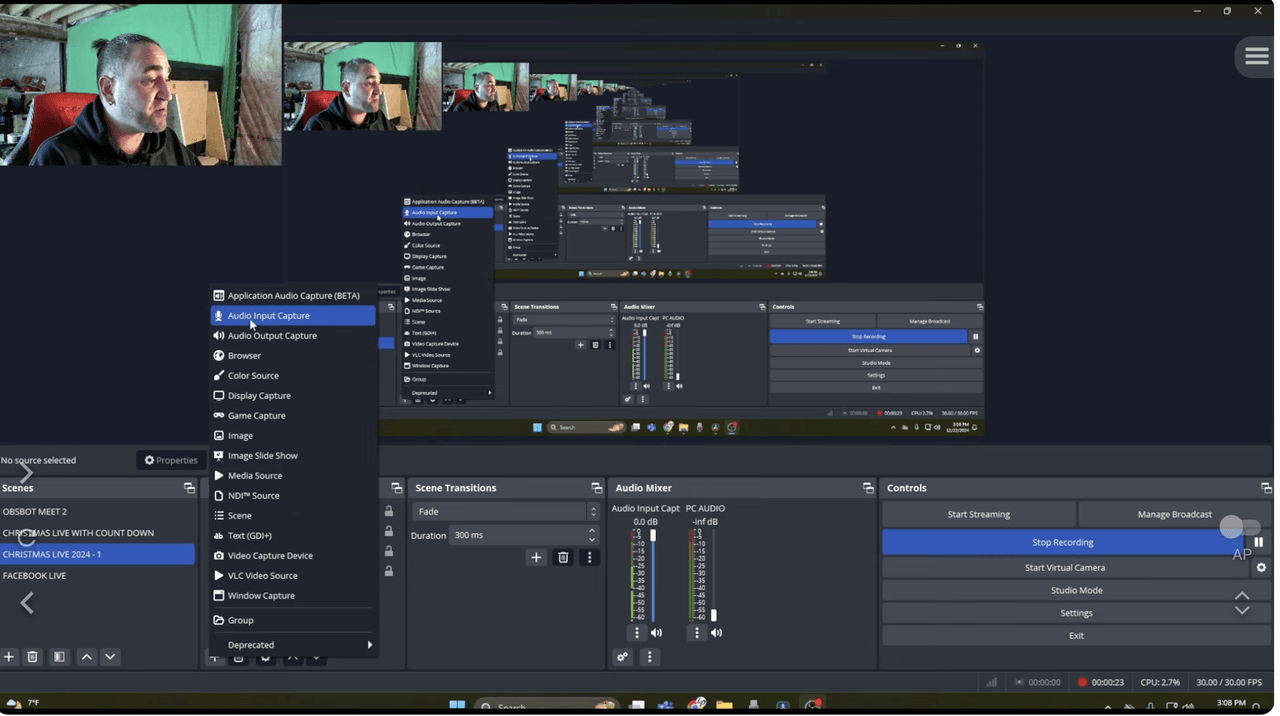
Open OBS on your computer.
Add video and audio sources:
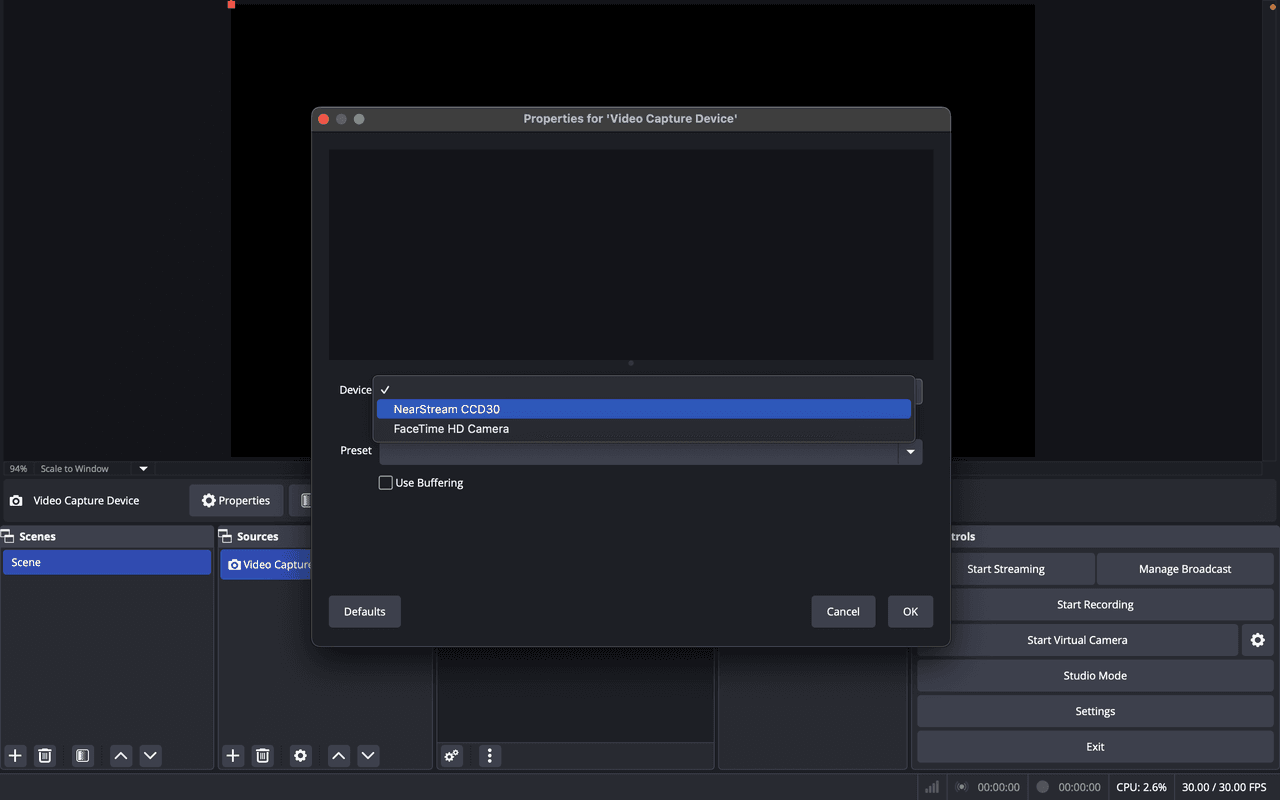
Go to Sources → Add → Video Capture Device → Select VM20 → Set the preset to High.

Go to Sources → Add → Audio Input Capture → Select AMIX40U as the audio source (since AM25X is connected through AMIX40U).

Set up scenes and transitions:
Create different scenes for intro, main content, and closing segments.
Set up transitions between scenes for a more polished broadcast.

Adjust audio levels using the AMIX40U mixer:
Use the gain knob on the AMIX40U to control microphone sensitivity.
Adjust output levels using the AMIX40U's volume knobs.
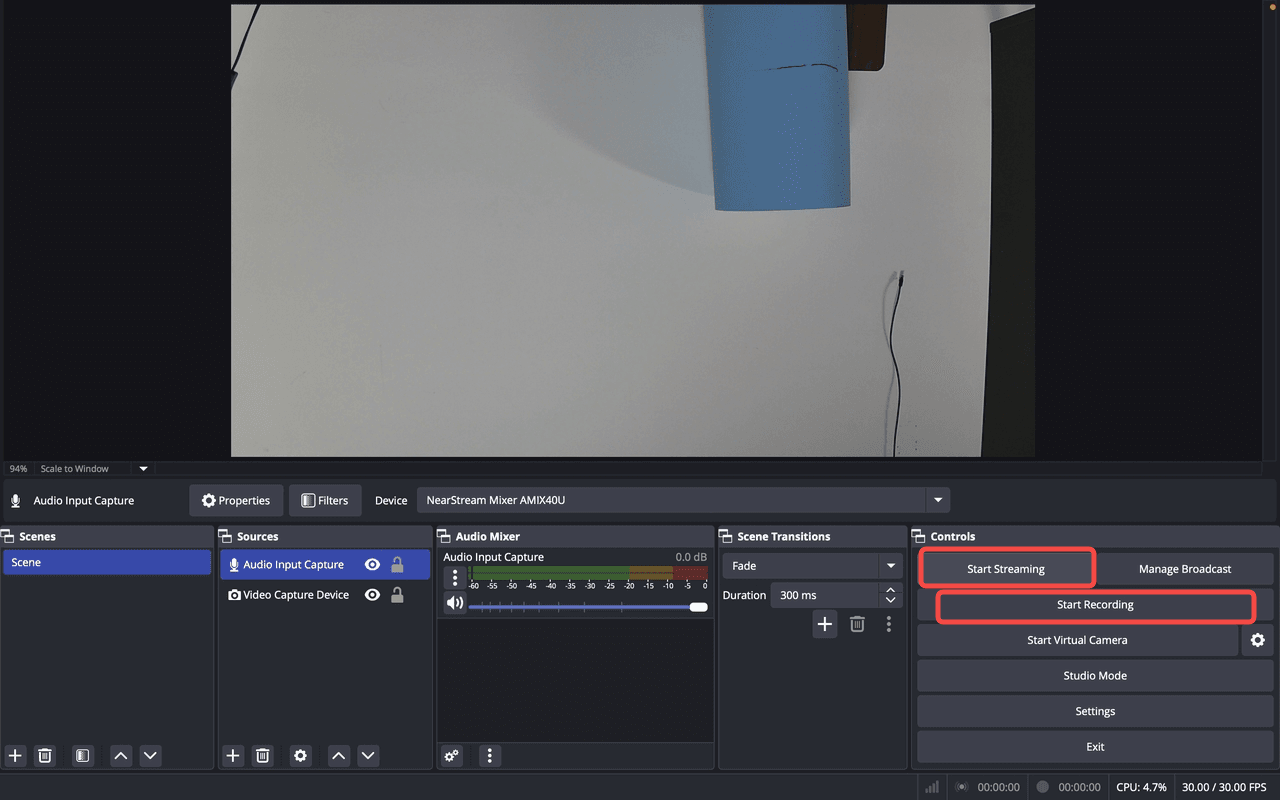
Start streaming or recording:
Click Start Streaming or Start Recording in OBS.
Monitor audio and video levels throughout the broadcast.
2P Podcasting
Open OBS on your computer.
Add video and audio sources:
Go to Sources → Add → Video Capture Device → Select VM20 (set one camera as "Device 1" and the other as "Device 2"). Notice: Disconnect other cameras when setting up each camera.

Go to Sources → Add → Audio Input Capture → Select AMIX40U as the audio source (both AM25X microphones are connected through AMIX40U).

Set up scenes and transitions:
Create different scenes for each podcaster’s camera feed.
Add a two-person split-screen view for interactive moments.
Set up smooth transitions between cameras.
Adjust audio balance and levels using the AMIX40U mixer:
Adjust gain levels separately for each microphone input.
Monitor the audio mix through headphones connected to the AMIX40U.

Start streaming or recording:
Click Start Streaming or Start Recording in OBS.
Monitor video and audio levels throughout the session.

4P Podcasting
Open OBS on your computer.
Add video and audio sources:
Go to Sources → Add → Video Capture Device → Select CCD30 Capture Card as the video source (since all VM20 cameras are routed through the HDMI switcher into the capture card). (set the cameras as "Device 1", "Device 2", "Device 3", "Device 4"). Notice: Disconnect other cameras when setting up each camera.
Go to Sources → Add → Audio Input Capture → Select AMIX40U as the audio source (both mixers are connected through AUX).

Set up scenes and transitions:
Create separate scenes for different camera angles.
Include a multi-camera view for a dynamic discussion layout.
Set up transitions between speakers and wide-angle shots.

Adjust audio and camera angles:
Use the AMIX40U mixers to control audio balance and levels for all four microphones.
Adjust each camera angle using the HDMI switcher’s remote control.

Start streaming or recording:
Click Start Streaming or Start Recording in OBS.
Monitor audio levels using the AMIX40U and make adjustments as needed.

Podcasting with Riverside
1P Podcasting
Open Riverside on your computer.
Create a new recording session:
Log in to Riverside and select Create New Recording.
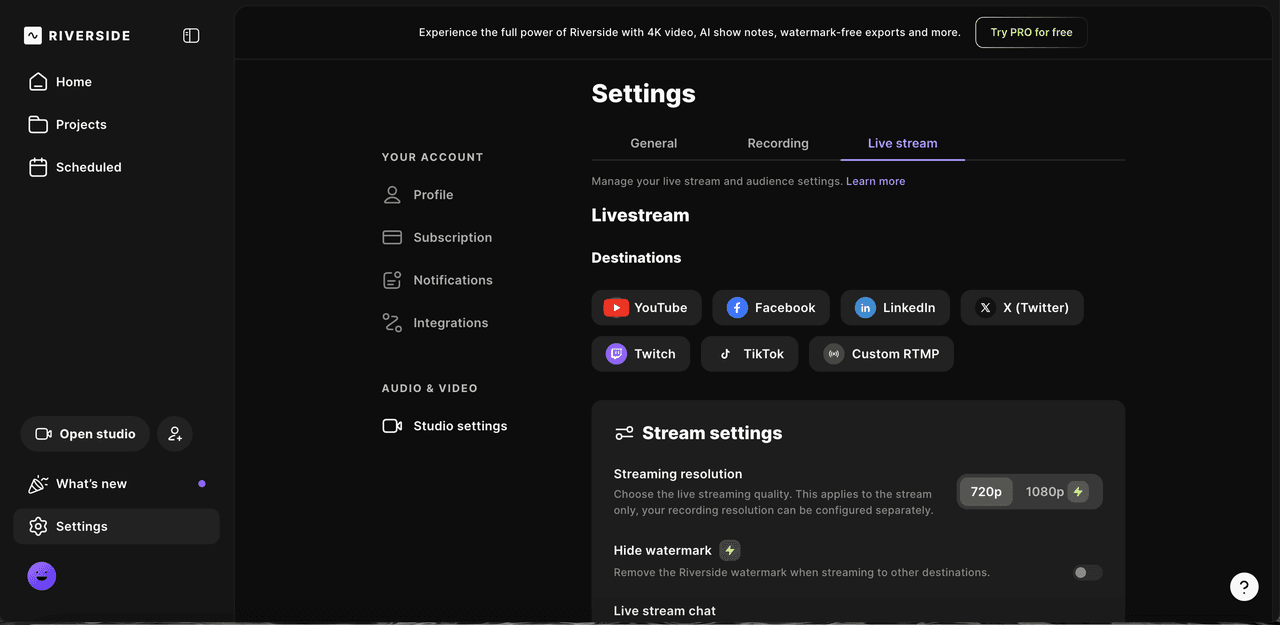
Name your session and adjust streaming/recording settings (resolution, frame rate, etc.).

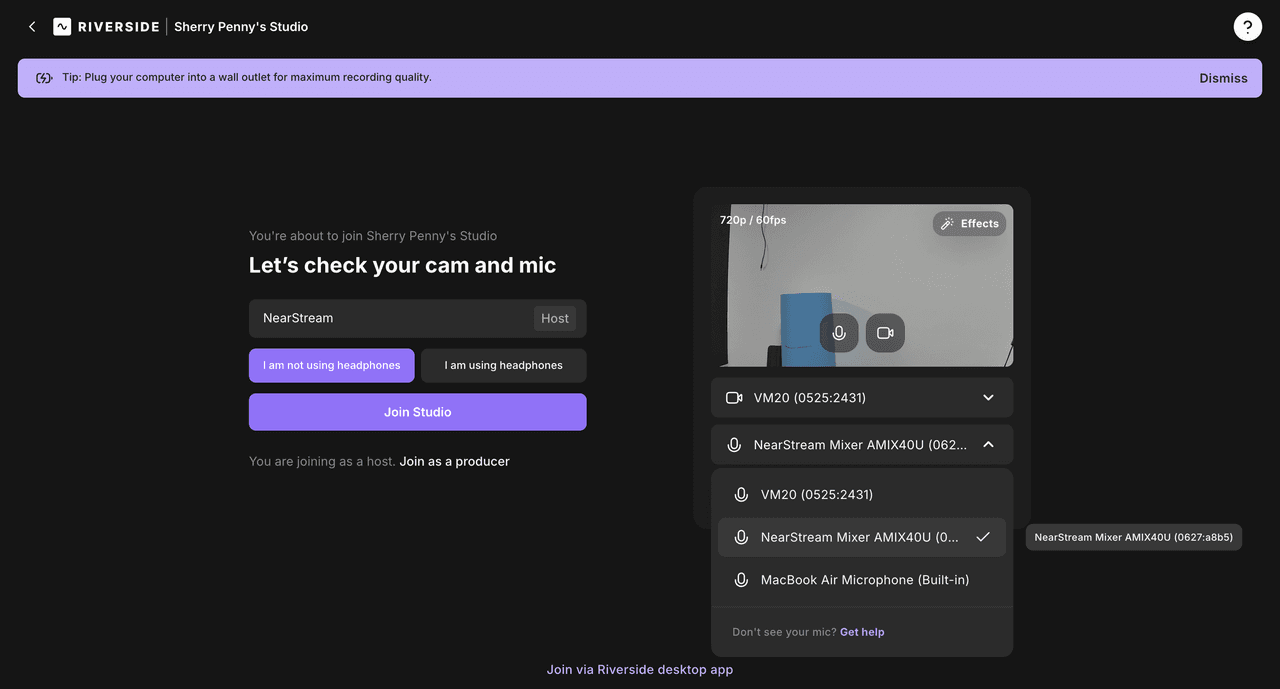
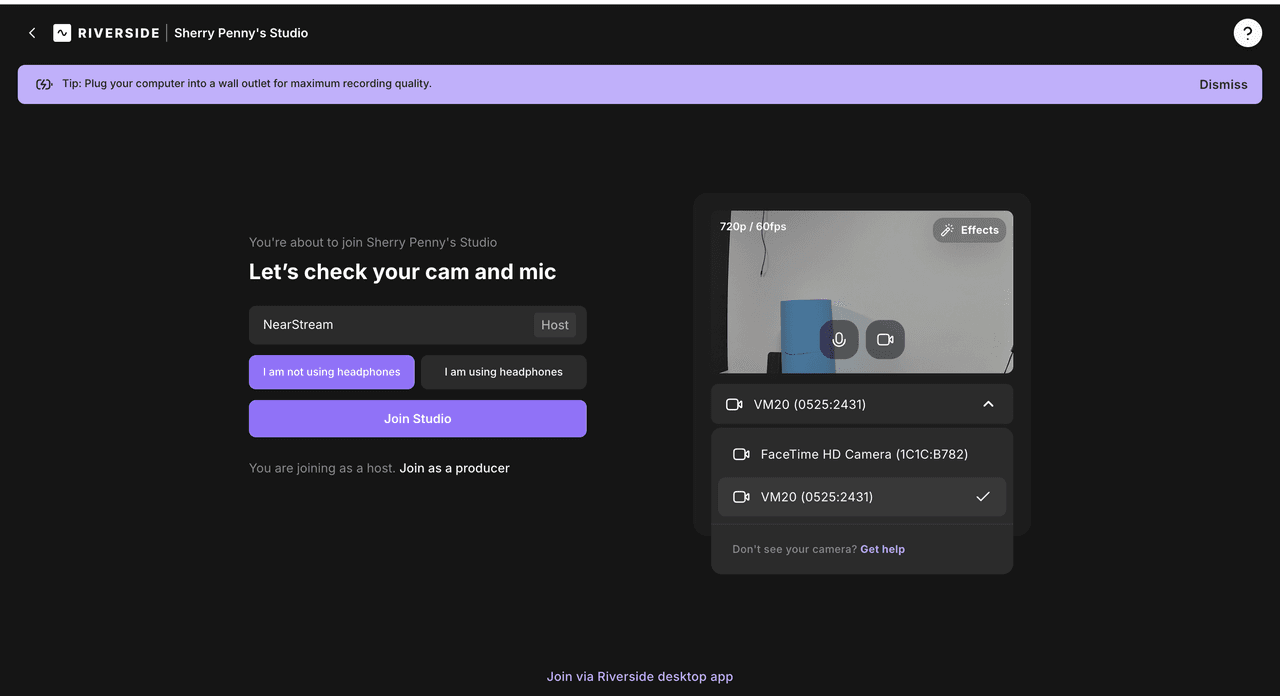
Add video and audio sources:
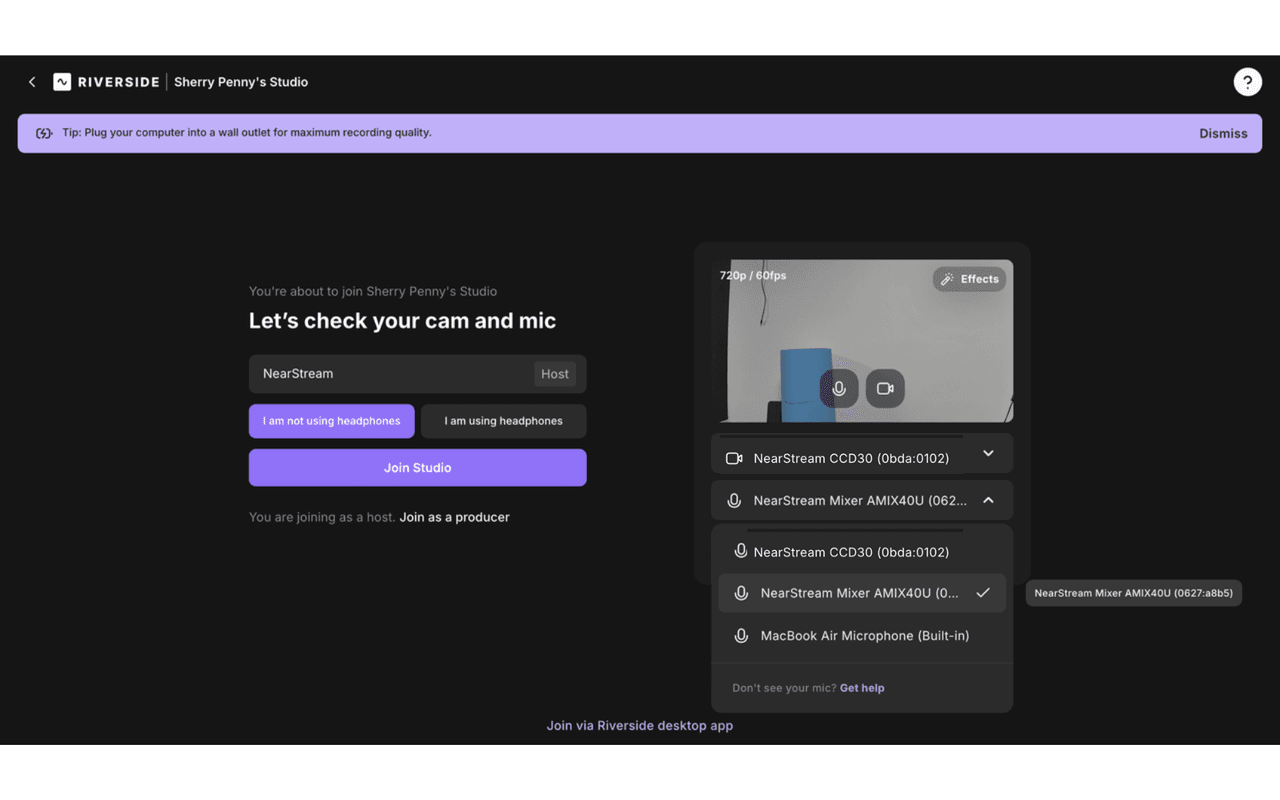
Select VM20 as the video source in Riverside.

Select AMIX40U as the audio source (since AM25X is connected to AMIX40U).
Configure recording settings:
Set video resolution to 1080p or 4K depending on your camera’s capability.
Enable separate audio and video tracks for easier post-production editing.

Start recording:
Click Start Streaming/Recording in Riverside.
Monitor audio levels through the AMIX40U mixer.
After that, download the files directly from Riverside for post-production.
2P Podcasting
Open Riverside on your computer.
Create a new recording session:
Log in to Riverside and select Create New Recording.
Name your session and adjust streaming/recording settings.

Add video and audio sources:
Select the two VM20s as the video source for each participant.
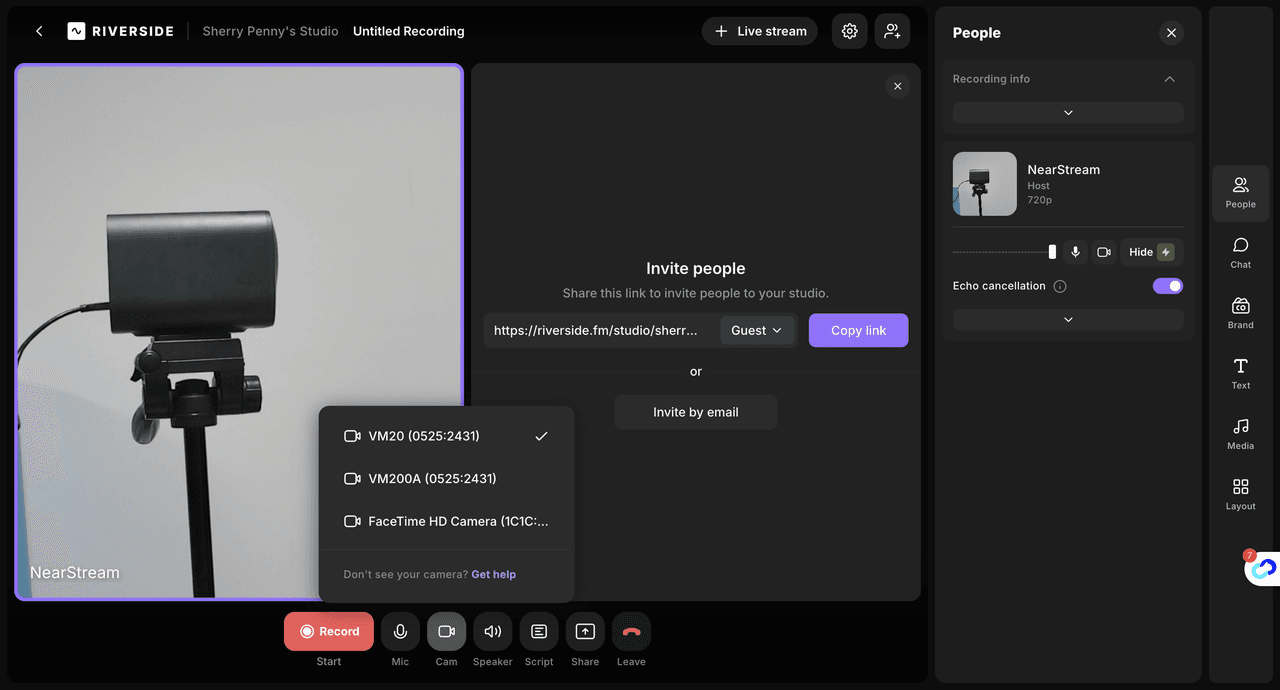
Select AMIX40U as the audio source (both AM25X microphones are connected through AMIX40U).

Configure recording settings:
Set video resolution to 1080p or 4K depending on your camera’s capability.
Enable echo cancellation and noise suppression.
Enable separate tracks for each participant to simplify post-production.

Start recording:
Click Start Streaming/Recording in Riverside.
Monitor audio levels using the AMIX40U mixer and adjust as needed.
After that, download the files directly from Riverside for post-production.
4P Podcasting
Open Riverside on your computer.
Create a new recording session:
Log in to Riverside and select Create New Recording.
Name your session and adjust streaming/recording settings.

Add video and audio sources:
Select CCD30 Capture Card as the video source (since all VM20 cameras are routed through the HDMI switcher).
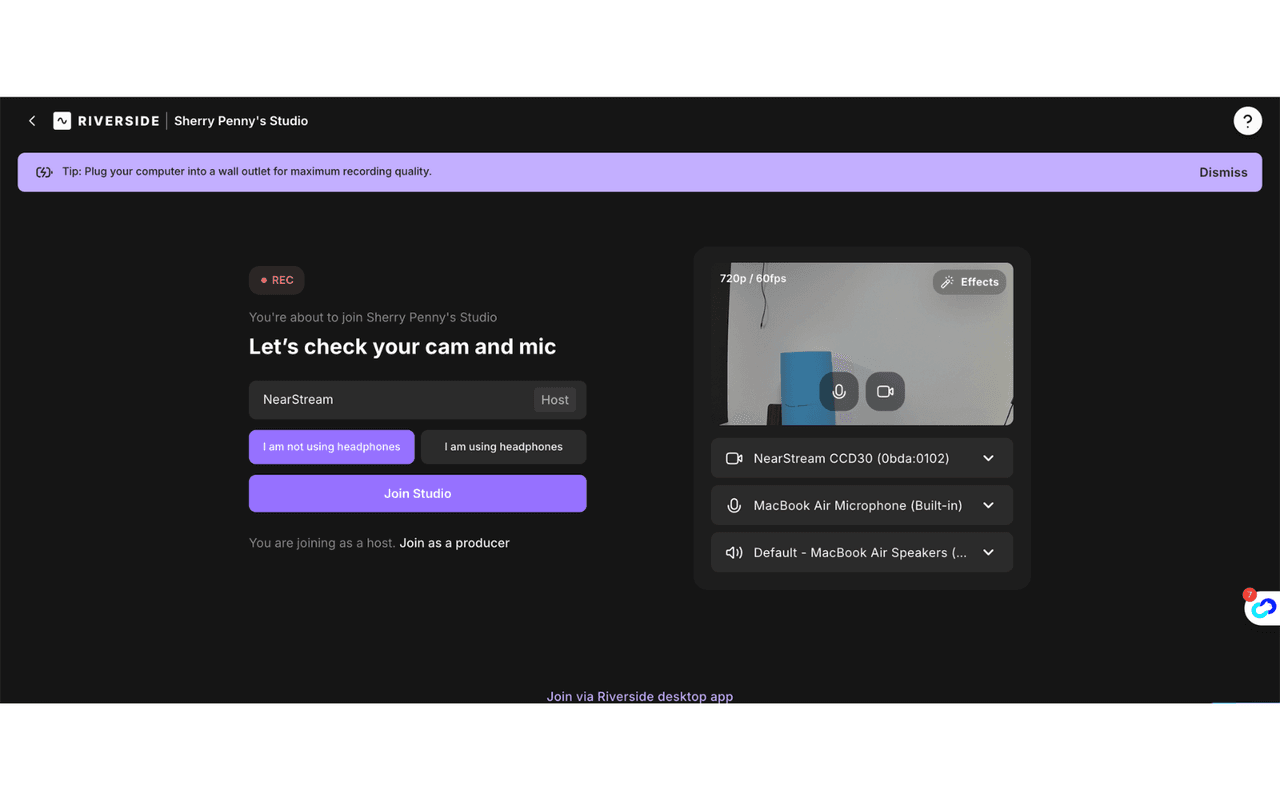
Select AMIX40U as the audio source (using an AUX cable to link both mixers).
Configure recording settings:
Set video resolution to 1080p or 4K depending on your camera’s capability.
Enable separate audio and video tracks for each participant.
Enable auto-leveling for consistent audio output.
Start recording:
Click Start Streaming/Recording in Riverside.
Monitor audio levels using the AMIX40U mixer and adjust as needed.
After that, download the files directly from Riverside for post-production.
Both OBS and Riverside offer robust features for podcasting. Riverside shines for remote podcasting, providing seamless integration for high-quality video and audio, especially when dealing with multiple participants. The ability to record each participant's audio and video locally ensures excellent sound and image quality, making it a powerful tool for any podcast setup.